Angkor Wat Guide – Plan Your Visit to the Temples of Angkor [2023]

Preah Khan Temple Cambodia

Which temples do you need to see at Angkor? How many days does it take to visit them all? What’s the best way to get around temples of Angkor? Fortunately, after reading this guide, all you have to do it worry about setting your alarm to watch the sunrise! Well, almost… 

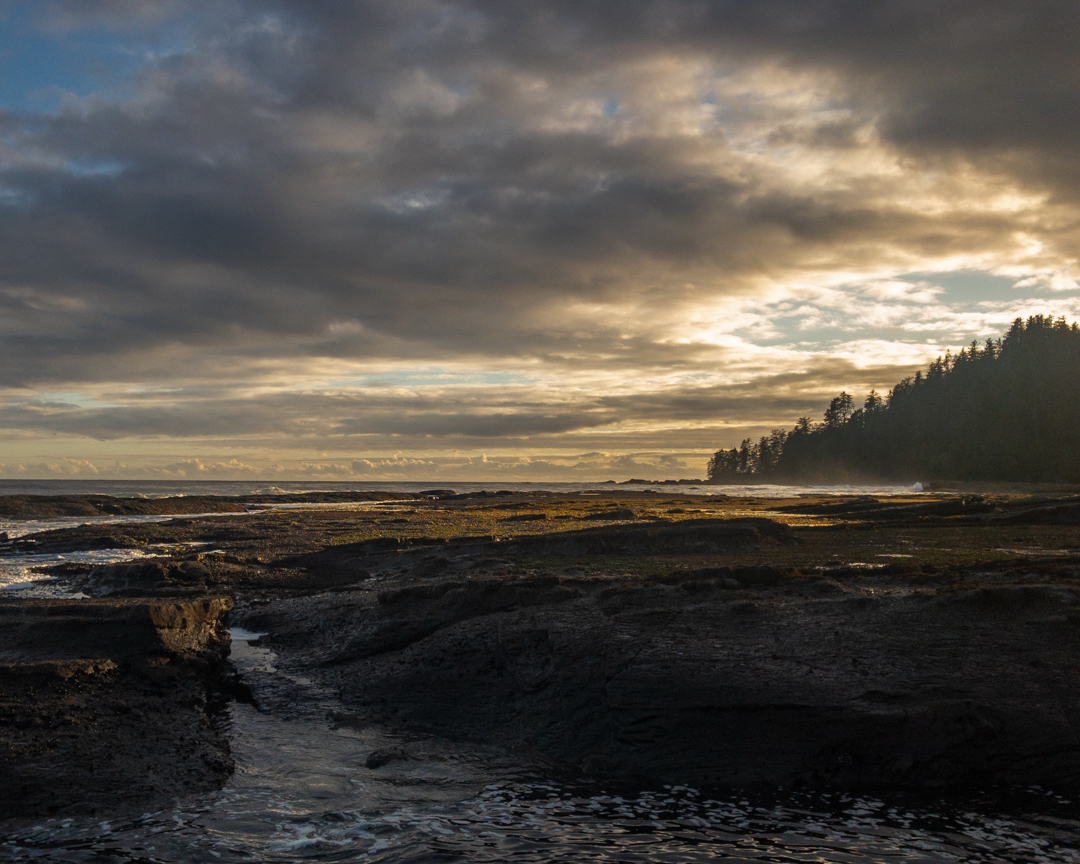
Angkor Archeological Park and Angkor Wat is a highlight of any trip to Cambodia or along the Banana Pancake Trail.  The ancient city of Angkor was once a vast civilization with a population of over 1 million people until it mysteriously collapsed and was subsequently absorbed back into the jungle.  Today,  Angkor Wat rivals  Macchu Picchu and the Great Pyramids in its ability to inspire awe in every visitor.

Spread out over a vast area, it’s likely that you’ll spend either one jam packed day or multiple days temple touring and fulfilling your own Indiana Jones or Tomb Raider fantasy.  Before we dive into the logistics, let’s look at the basics for visiting Ankgor Wat.

How do you get to Angkor Wat?

Angkor Wat is located adjacent to Siem Reap , the jumping off point for anyone exploring the temples of Angkor. Siem Reap is easily accessed by plane or bus. For more details on getting here or get tips on Siem Reap, check out our Cambodia Itinerary planner.

How much does it cost to visit Angkor Wat?

There are three options for visiting the temples of Angkor. 

    • One day ($37 (valid only on the day of purchase). The essential package. 
    • Three days $62 (valid for 10 days from the date of purchase) Typically the sweet spot. 
    • Seven days $72 (valid for one month from the date of purchase). For serious temple buffs or those hanging out in Siem Reap for an extended period of time. 
Preah Khan Temple Cambodia

What to pack for Angkor Wat

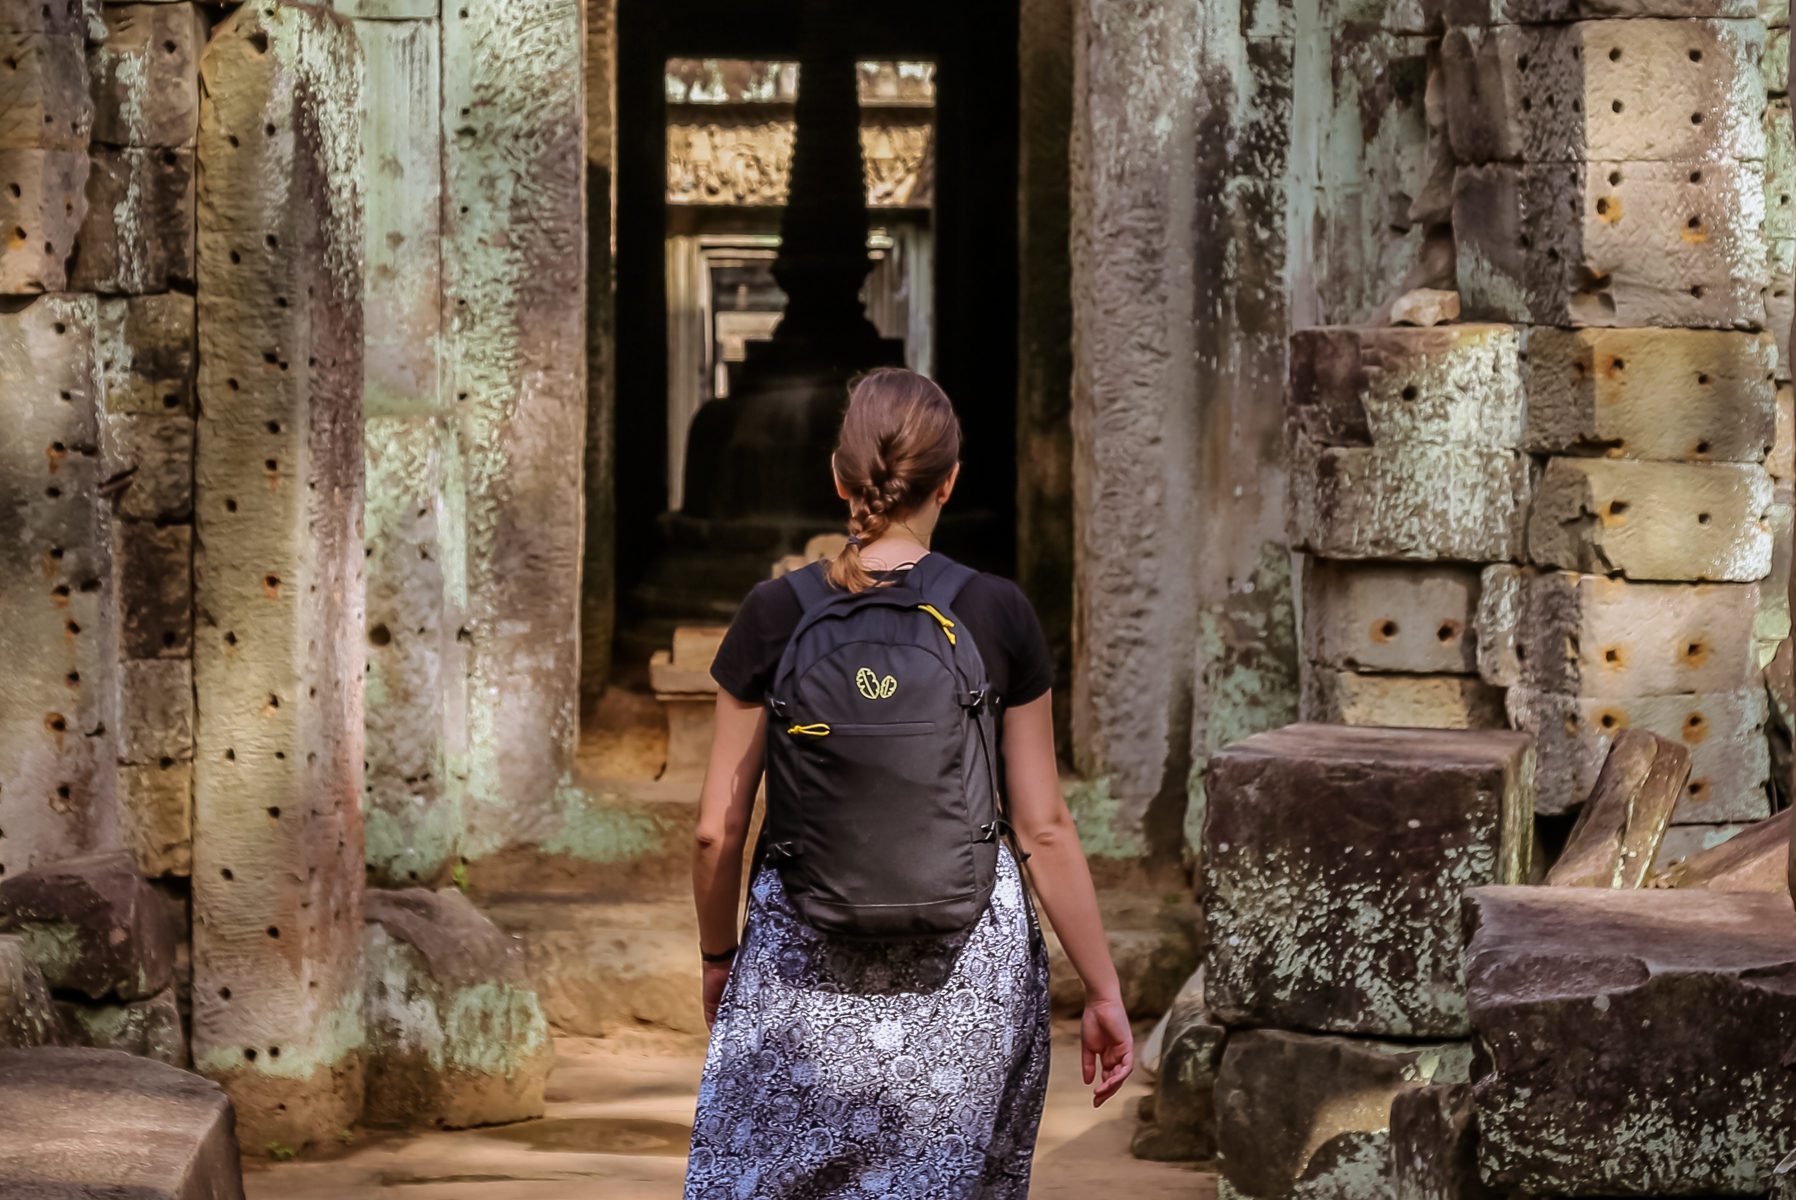
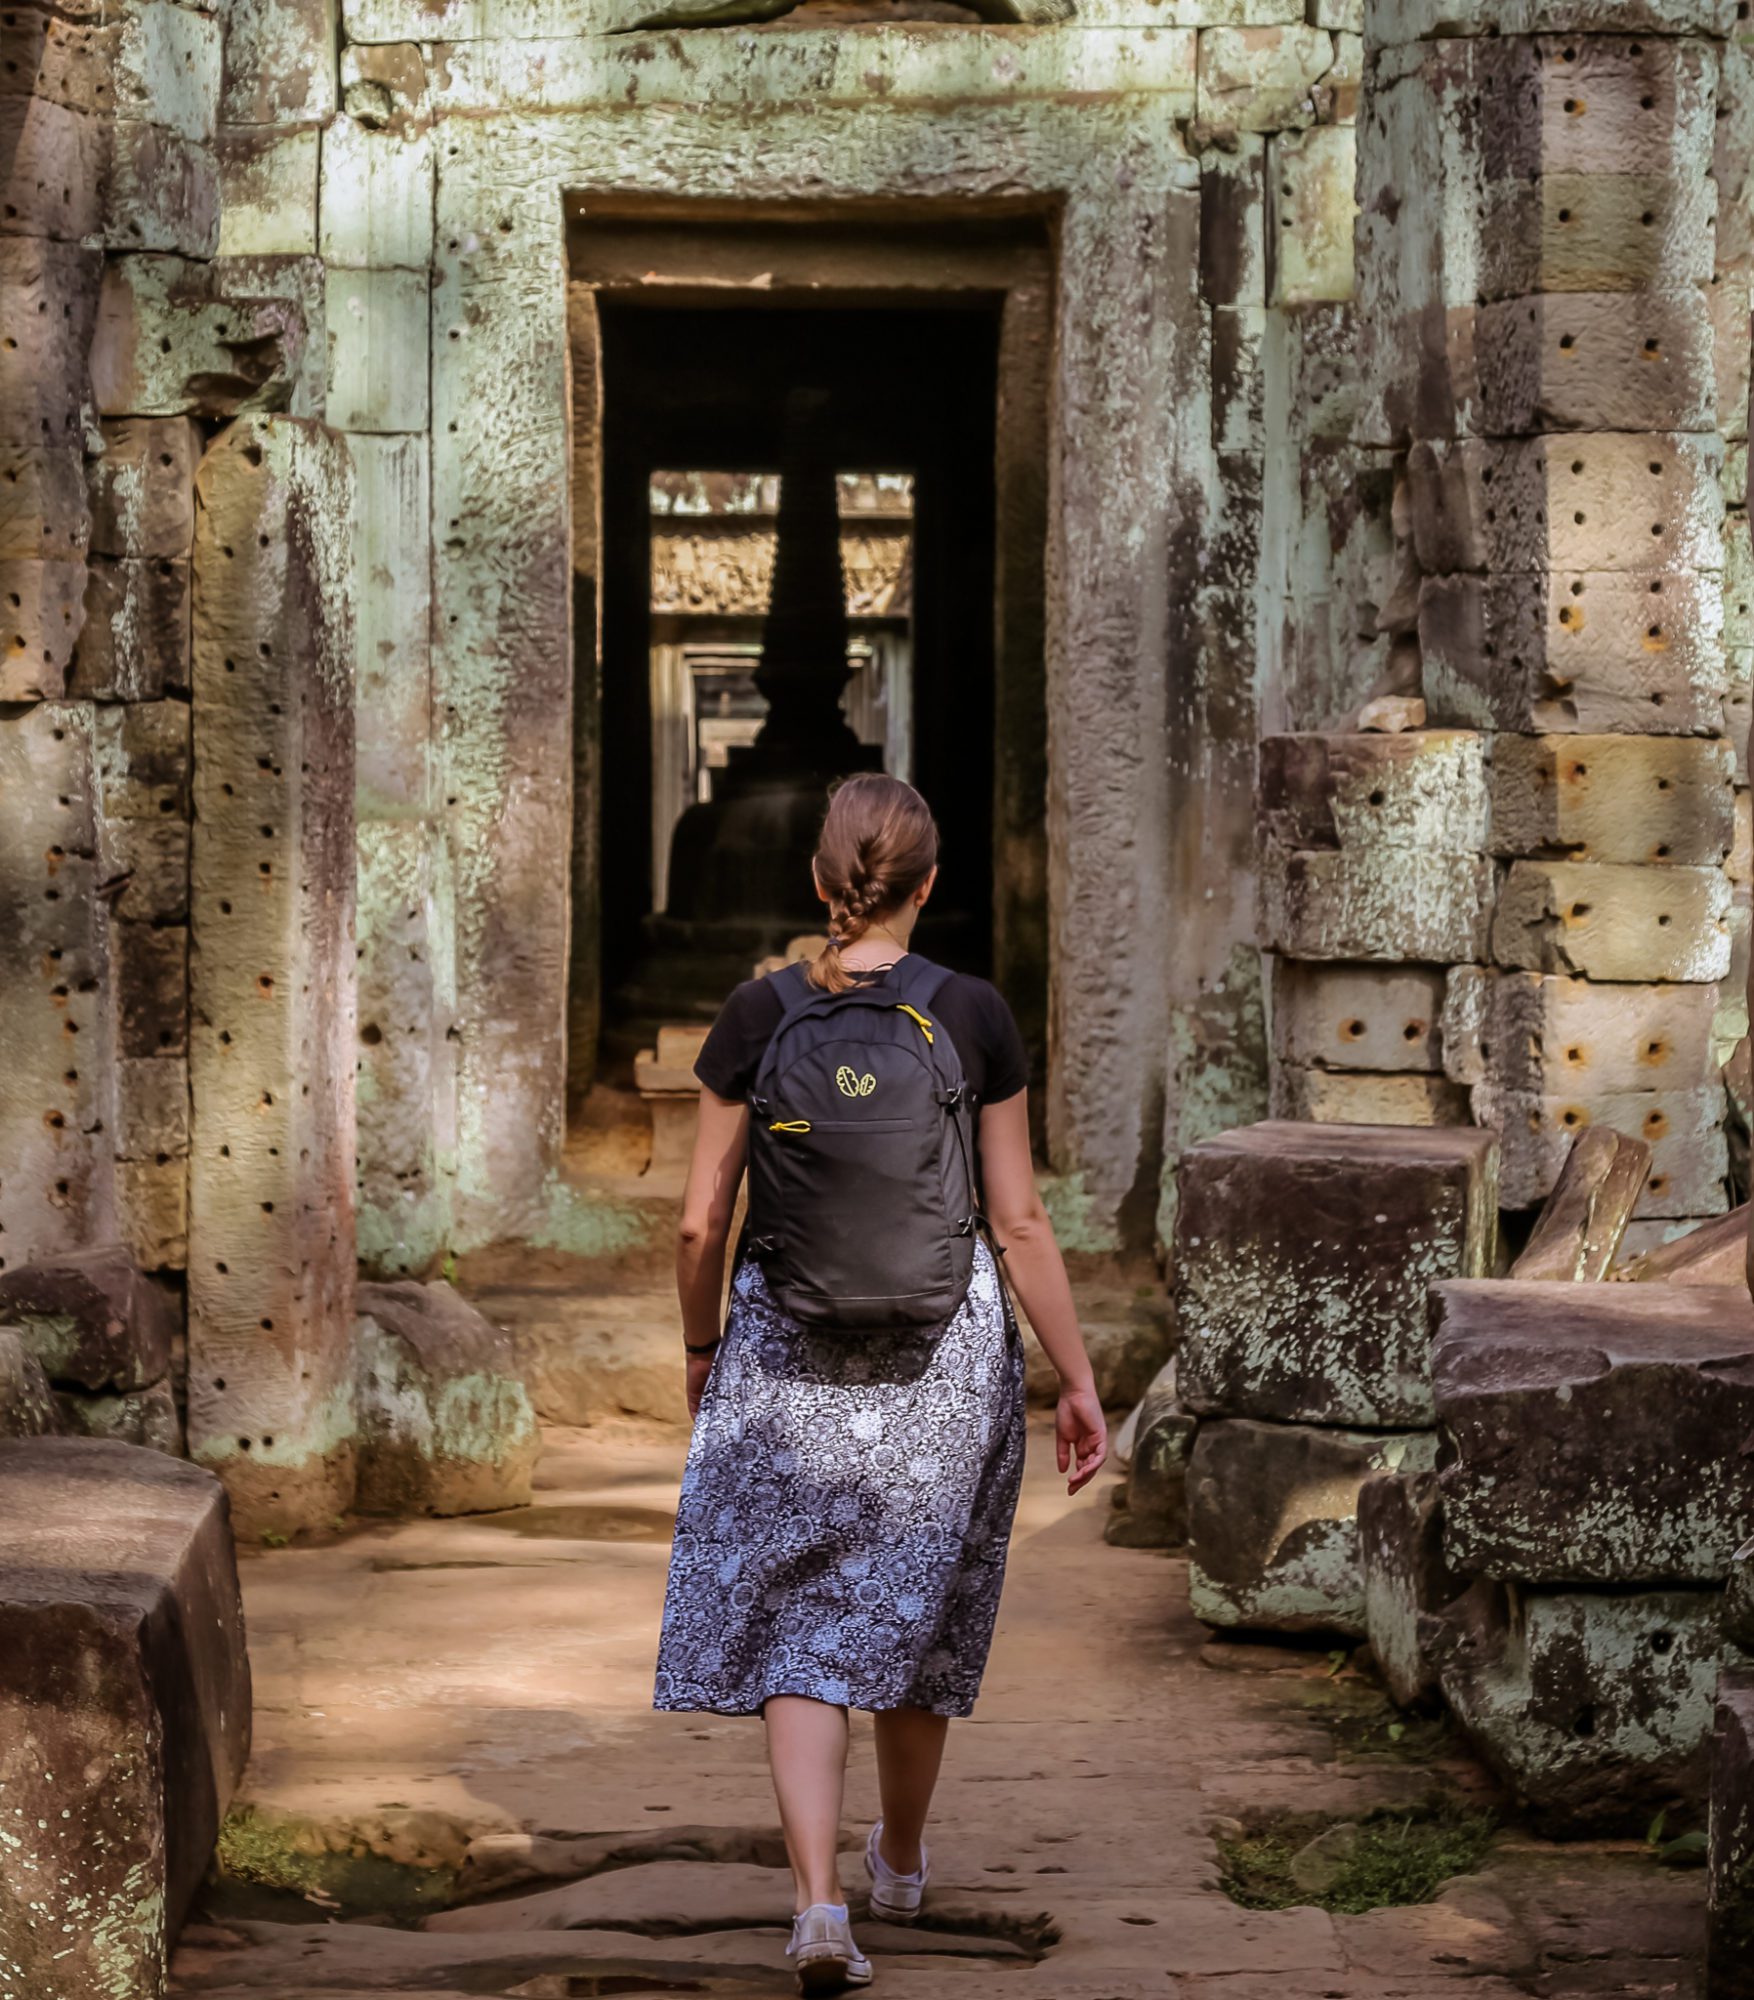
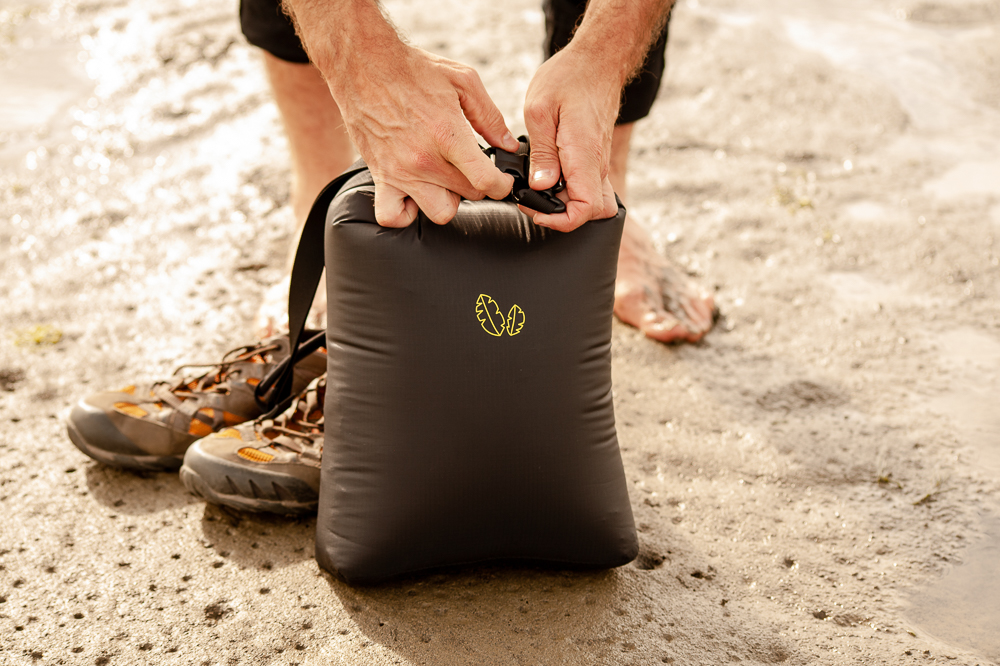
    • A small everyday backpack like our Kiri pack. 
    • Water (lots) and a few snacks.
    • Your ticket (it will be checked at numerous checkpoints).
    • Sunscreen.
    • A hat.
    • Sunglasses.
    • Bug spray.

DON'T FORGET THIS!

Unfortunately, when you’re riding bikes on busy roads, and climbing steep slippery steps up ancient temples,  medical emergencies can happen and you need to be prepared! A friend of ours was medevaced to Bangkok from Cambodia and spent several weeks in the hospital there to the tune of $750,000. Fortunately, she had travel insurance! 

Check out World Nomads*  for a quote. Their coverage includes medical emergencies, luggage & gear and trip cancellation.  Hopefully, you never need to make a claim, but if you do you’ll be beyond happy you were prepared!

*We receive a fee when you get a quote from World Nomads using this link. We do not represent World Nomads. This is not a recommendation to buy travel insurance.

When to buy a ticket for Angkor Wat?

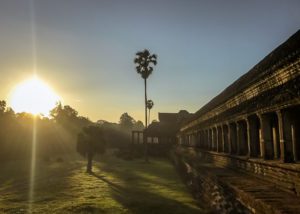
Buy your ticket the evening before your day of exploration anytime after 5pm to avoid having to make an extra stop to the ticket booth on your first morning. You’ll also get access to the Park that night, offering you the bonus of watching the sunset to kick off your temple touring. The most popular sunset spot, Phnom Bakheng, was extremely busy pre-pandemic but less so as of our last visit in 2022. The temple Pre Rup is also open until 7pm and is a great way to start your adventure after buying your ticket.

What should you wear to visit Angkor Wat?

The Angkor Park remains an active religious site. As such, it’s recommended that you wear a shirt that covers your shoulders and shorts/pants/skirt/dress that extend below your knees. Individuals not meeting this dress code have been rejected entry in some cases, so do air on the side of caution and respect. Beyond these considerations, wear something comfortable and breezy as the heat here can be stifling. 

Scams at Angkor Wat

While rare, in some of the smaller temples you may be chatted up by a child or adult who gives you a tragic tale about a series of unfortunate events that led them to a very poor financial position. The conversation may start out as just a friendly conversation that you can easily mistake as getting to know a local, but it will inevitably find its way to their dire situation. These individuals are generally cons, so do your best to get out of the conversation and politely leave when it starts taking a turn. There are plenty of ways to help out by donating your money or time to organizations truly making a difference in Cambodia, so choose this option instead to be a responsible traveller.

How to get around the Temples of Angkor

Angkor Archeological Park is big, really big! In light of this, walking from temple to temple is out of the question. Generally the two most common options are traveling by hired tuk-tuk or by bicycle,

Hire a tuk-tuk to take you around Angkor

$15-20 for the day

From the minute you arrive in Siem Reap, every driver, tuk-tuk driver, and tout will ask you how you plan to see the temples and eagerly offer their expert guiding services to you. Seeing the temples by tuk-tuk is a great way to go when it comes to staying as comfortable as possible in the Cambodian heat. Generally, many tuk-tuk drivers have a good idea of which temples to visit and at which times. They’ll help you plan out your itinerary and wait for you while you take the time to tour each one. Often the biggest challenge is finding the right driver. I’ve had good luck taking a driver affiliated with my hotel, hostel or guesthouse and usually recommend going this route. Alternatively, talk to a few before committing and pick the person you like the best!

Rent a bike and pedal around Angkor Wat

$1-9 (bike quality dependent)

Cycling is a great way to explore the temples of Angkor and truly appreciate the beauty of the magical scenery in this area. Many hotels and guesthouses make bikes easily available for rent to guests. Don’t underestimate this though, as you can easily be cycling for 17 km (Small Circuit) or 26 km (Big Circuit) in the scorching Cambodian heat depending on the route you choose. If you decide to take a bicycle, be prepared to sweat, and remember to bring a headlamp if you go out for sunrise. I’ll never forget the intense paranoia I had of becoming roadkill in the pre-dawn as hundreds of tuk-tuks and tour buses cruised past me as I peddled furiously along the road to Angkor Wat. If you need help planing your cycling excursion, use the map and guide below.

Best hotels and hostels to stay at for visiting the temples of Angkor

You’ll be staying in the nearby town of Siem Reap which offers innumerable places to stay. I asked Anika, a member of our team, to weigh in on the best options as she’s been living in Cambodia since 2018 and visiting Siem Reap every couple months. 

For 2023, her top picks are:

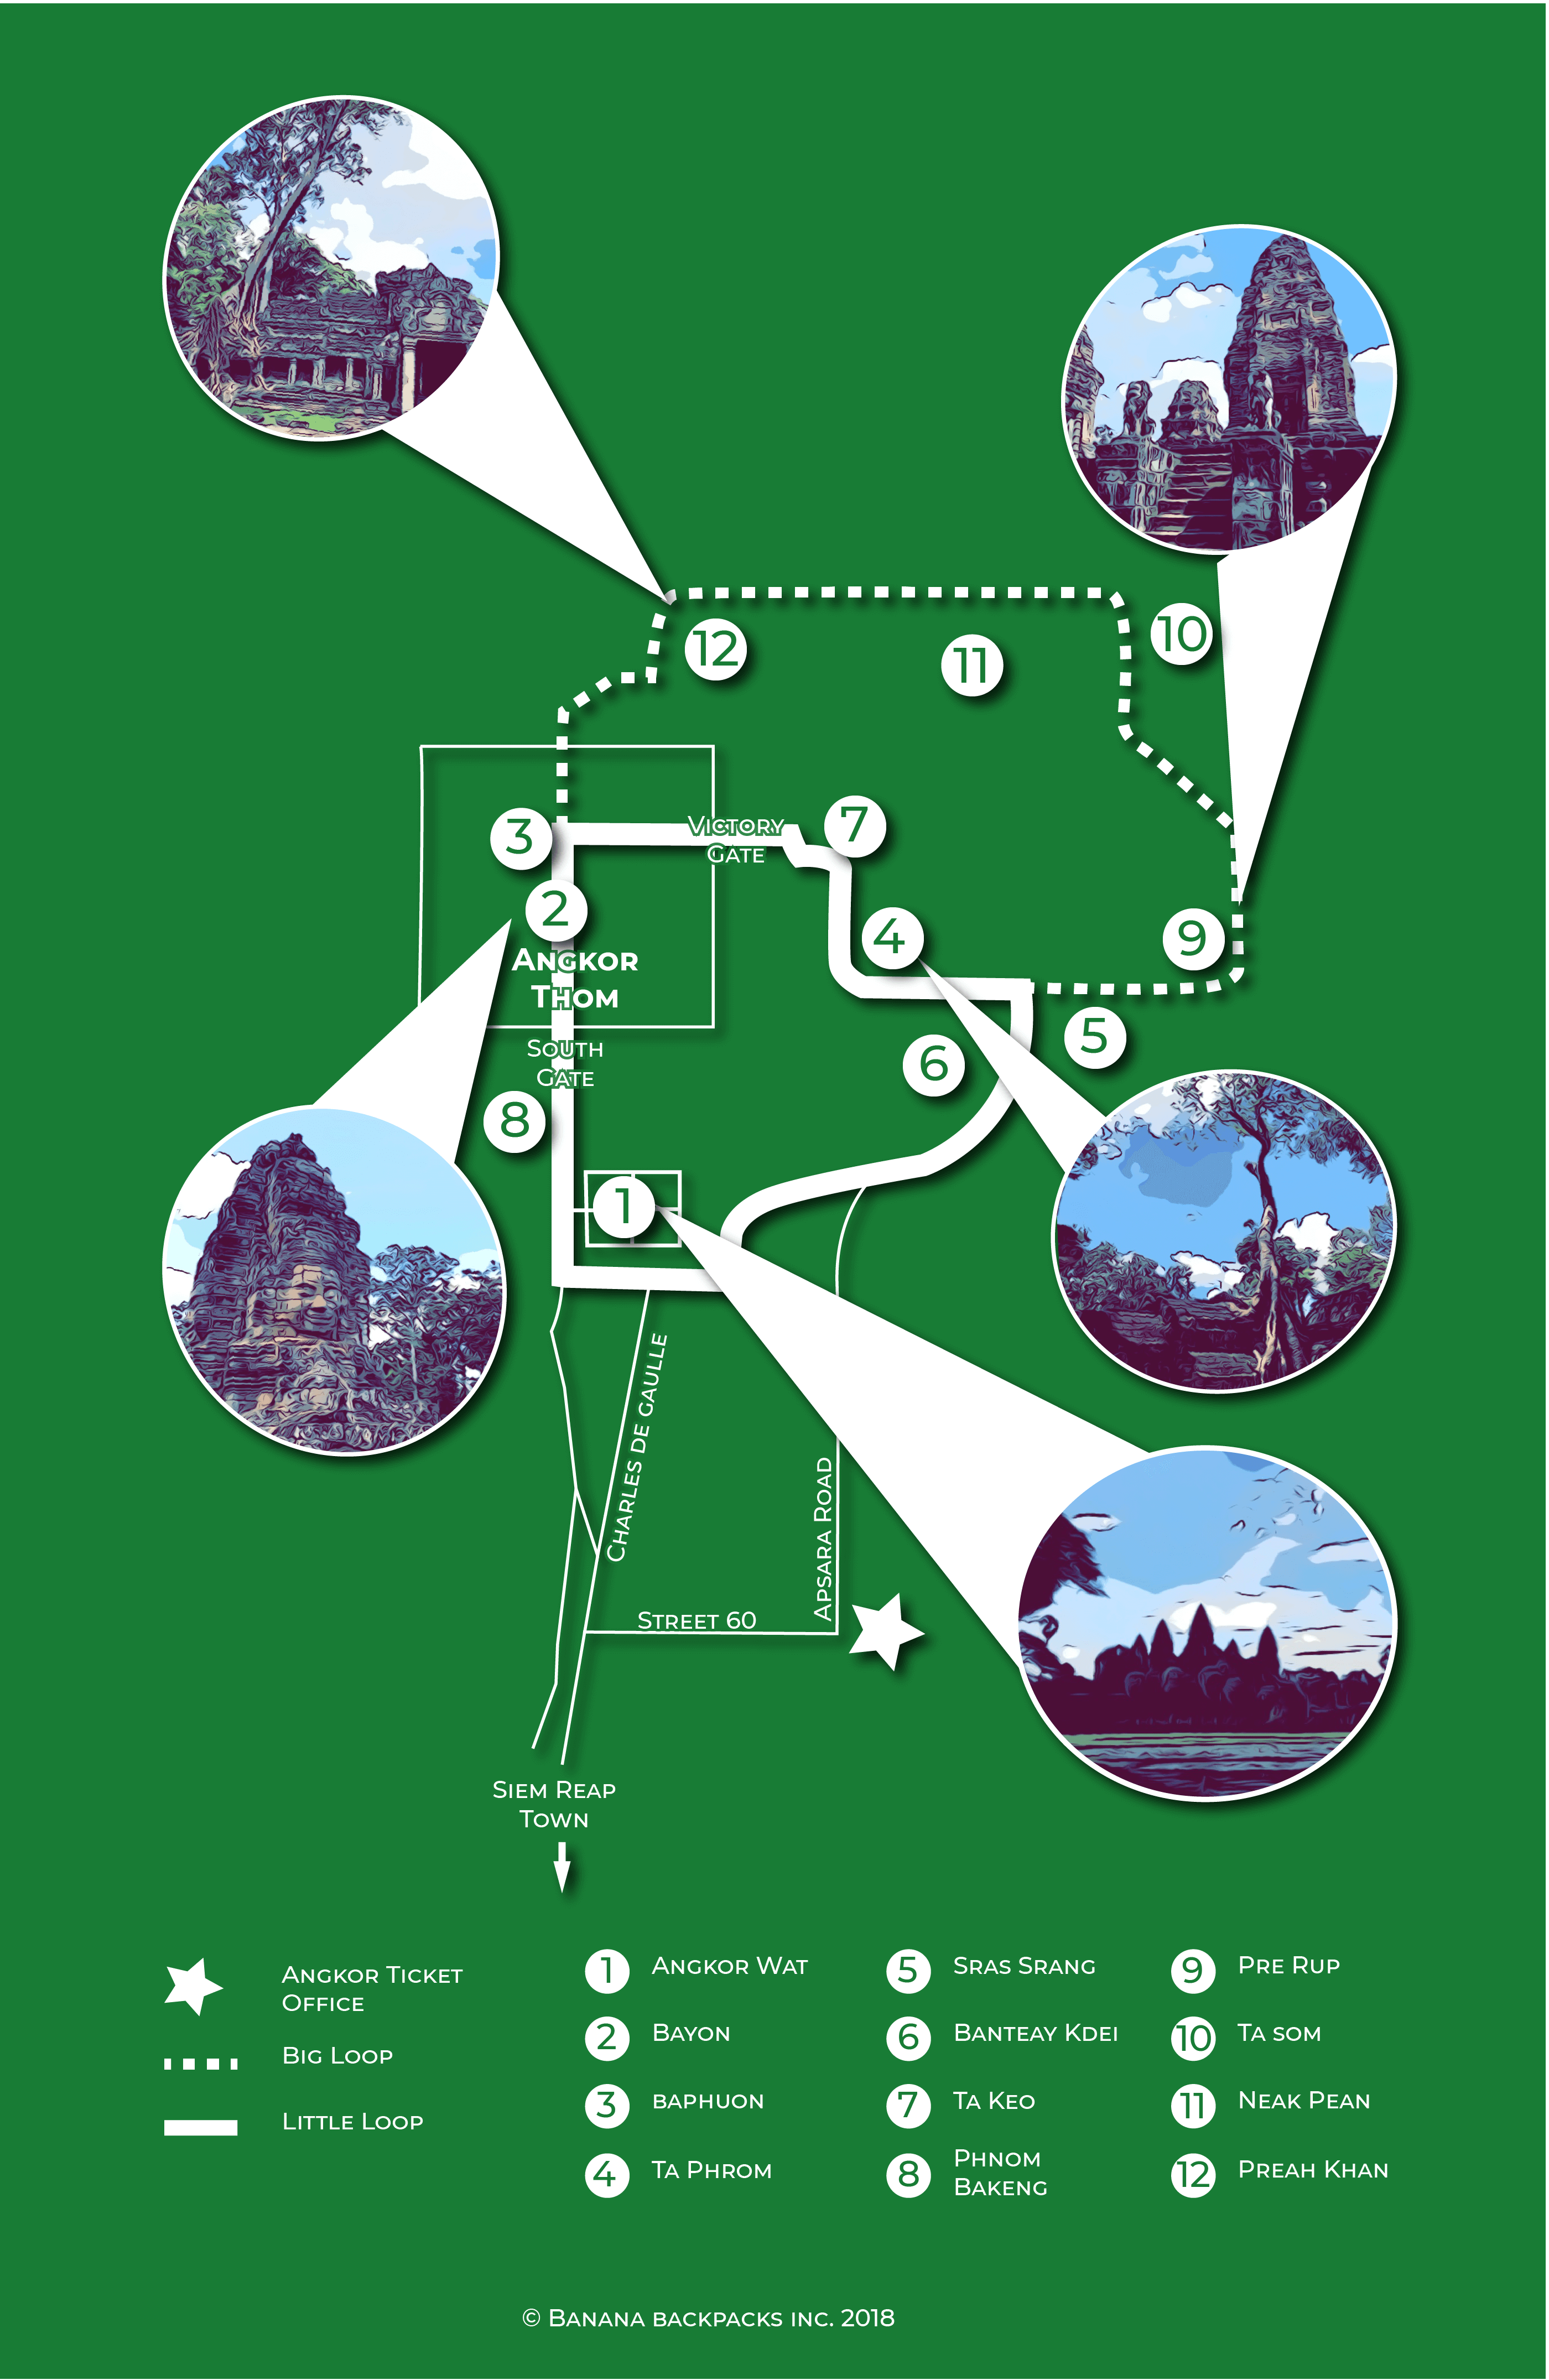
Navigating the Temples of Angkor - the small loop and big loop

The Angkor Park is broken down into 2 loops:

    • The Small Loop (~17km)
    • The Big Loop (~26km)

If you’re visiting Angkor for 1 day you will likely stick to the highlights of the Small Circuit.

 If you have 3 days, you’ll move onto the Big Circuit. 

If you have even more time, you’ll be able to spend a lot of time wherever you want and double down on your favourites.

Map of the Temples of Angkor

You’ll be able to pick up a general map of Angkor at your hotel or hostel, but save this image below to your phone for quick reference.

What temples should you visit at Angkor?

Deciding which temples to visit depends on how much time you have and how quickly you get “templed out”. Use the descriptions of the temples below to help you decide which temples are your own “must-sees”. I’ve marked several temples as must sees to help you narrow your choices if you’re short on time. 

Temples to visit in the Angkor Small Loop

Angkor Wat at Sunrise

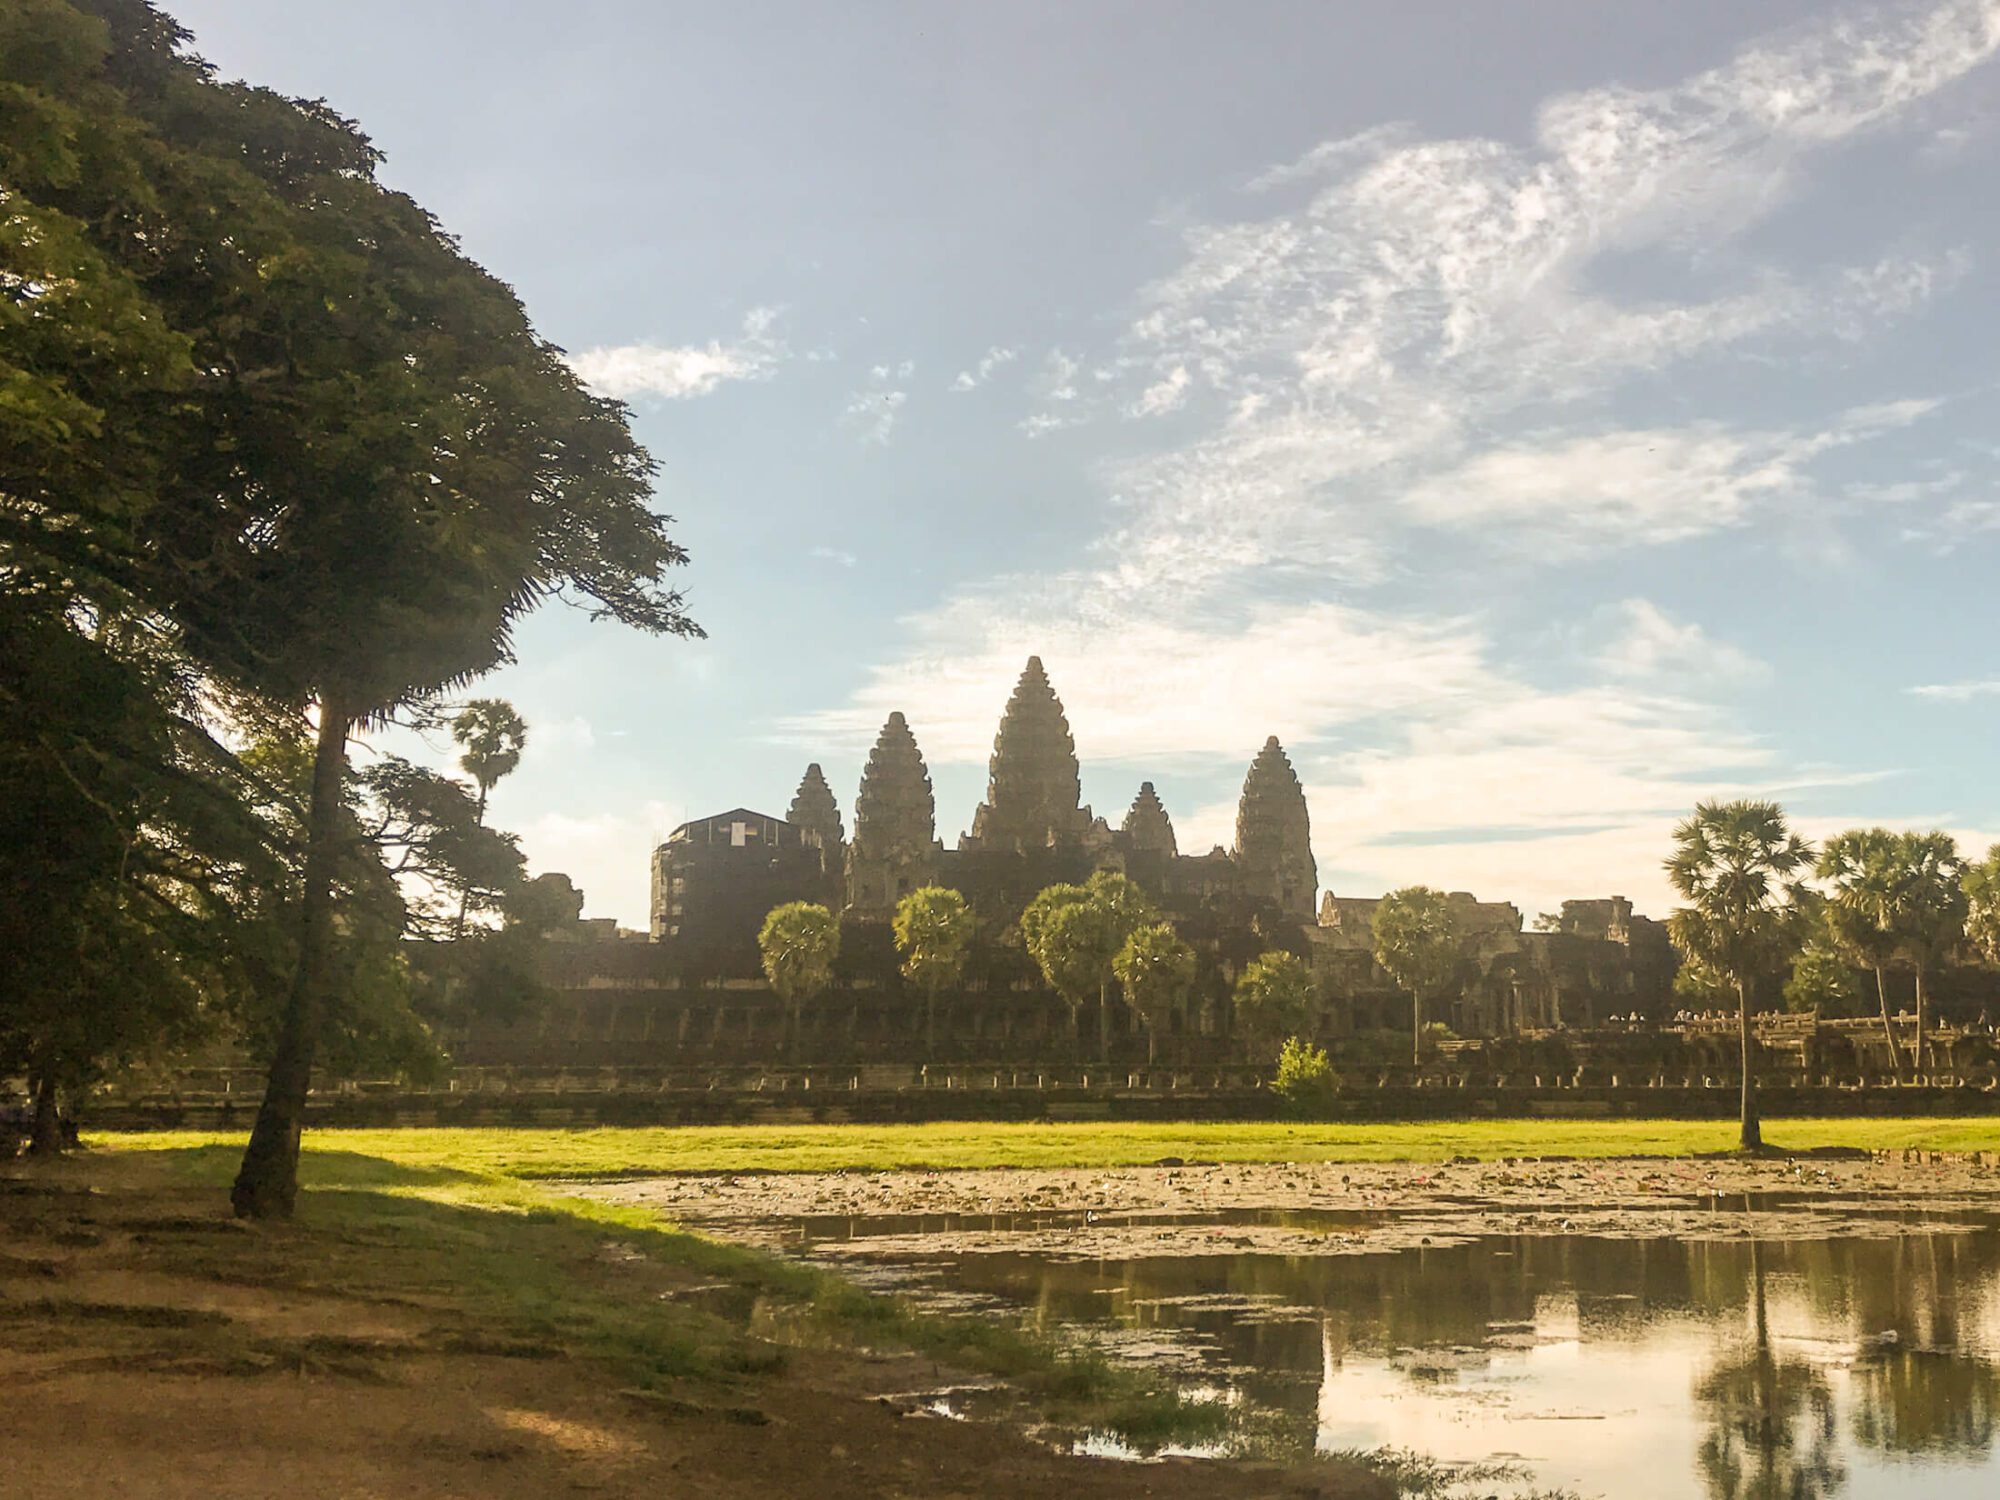
Angkor Wat - Must See

The largest religious site in the world, Angkor Wat is a spectacular 12th century temple that was originally dedicated to the Hindu god Vishnu and designed to represent Mount Meru, the sacred 5-peaked mountain of Hindu, Jain, and Buddhist cosmology. Despite the mass of crowds, a sunrise (~5 am) here is a truly unique experience. Make sure to spend time admiring the massive lengths of bas-reliefs and finding some relative solitude as the bulk of tourists eat breakfast or rub the sleep out of their eyes following the sunrise.

Phnom Bakheng

This hilltop temple near to Angkor Wat is a hotspot for sunset vistas. But with great views come great crowds. Pre-pandemic you had to arrive here early if you wanted to get a spot, but it’s much quieter these days as tourism in Cambodia is only slowly picking up again. During the day this is a place to find solitude, although it gets extremely hot during midday as there is no tree cover once you reach the temple
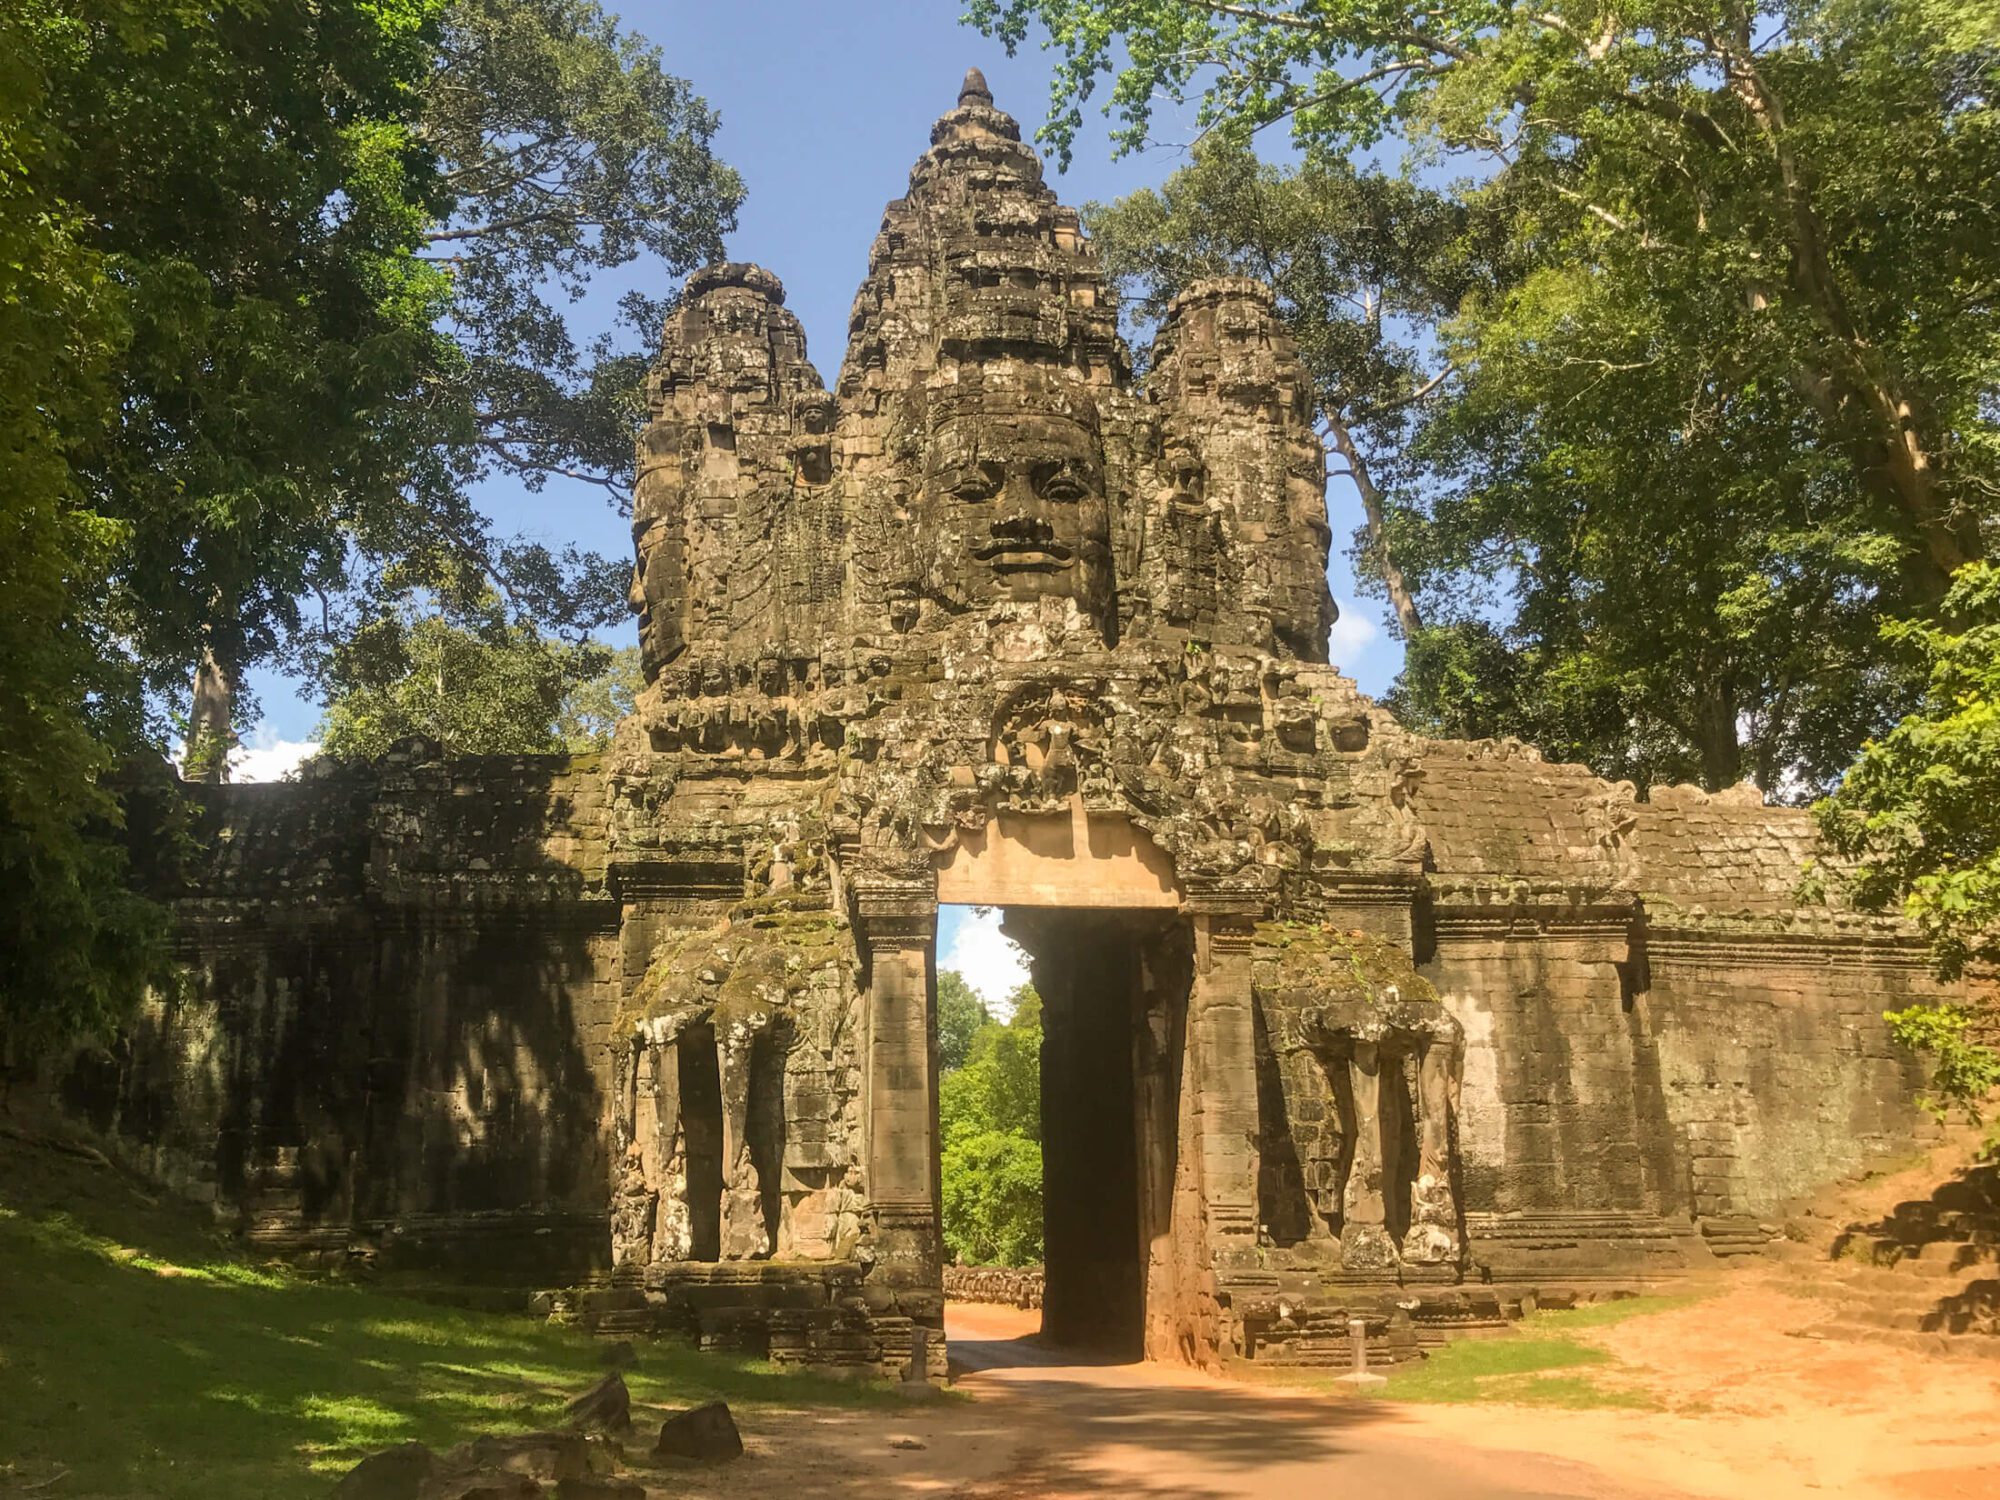
Angkor Thom

 Literally means “Great City”. If ever there was an ancient city worthy of its namesake, it’s Angkor Thom. The minute you enter, over the gigantic moats, through the walls, and beneath the faces that watch over each gate, you will be taken aback by the size and scale of this ancient citadel. The following temples are highlights within the Angkor Thom complex:
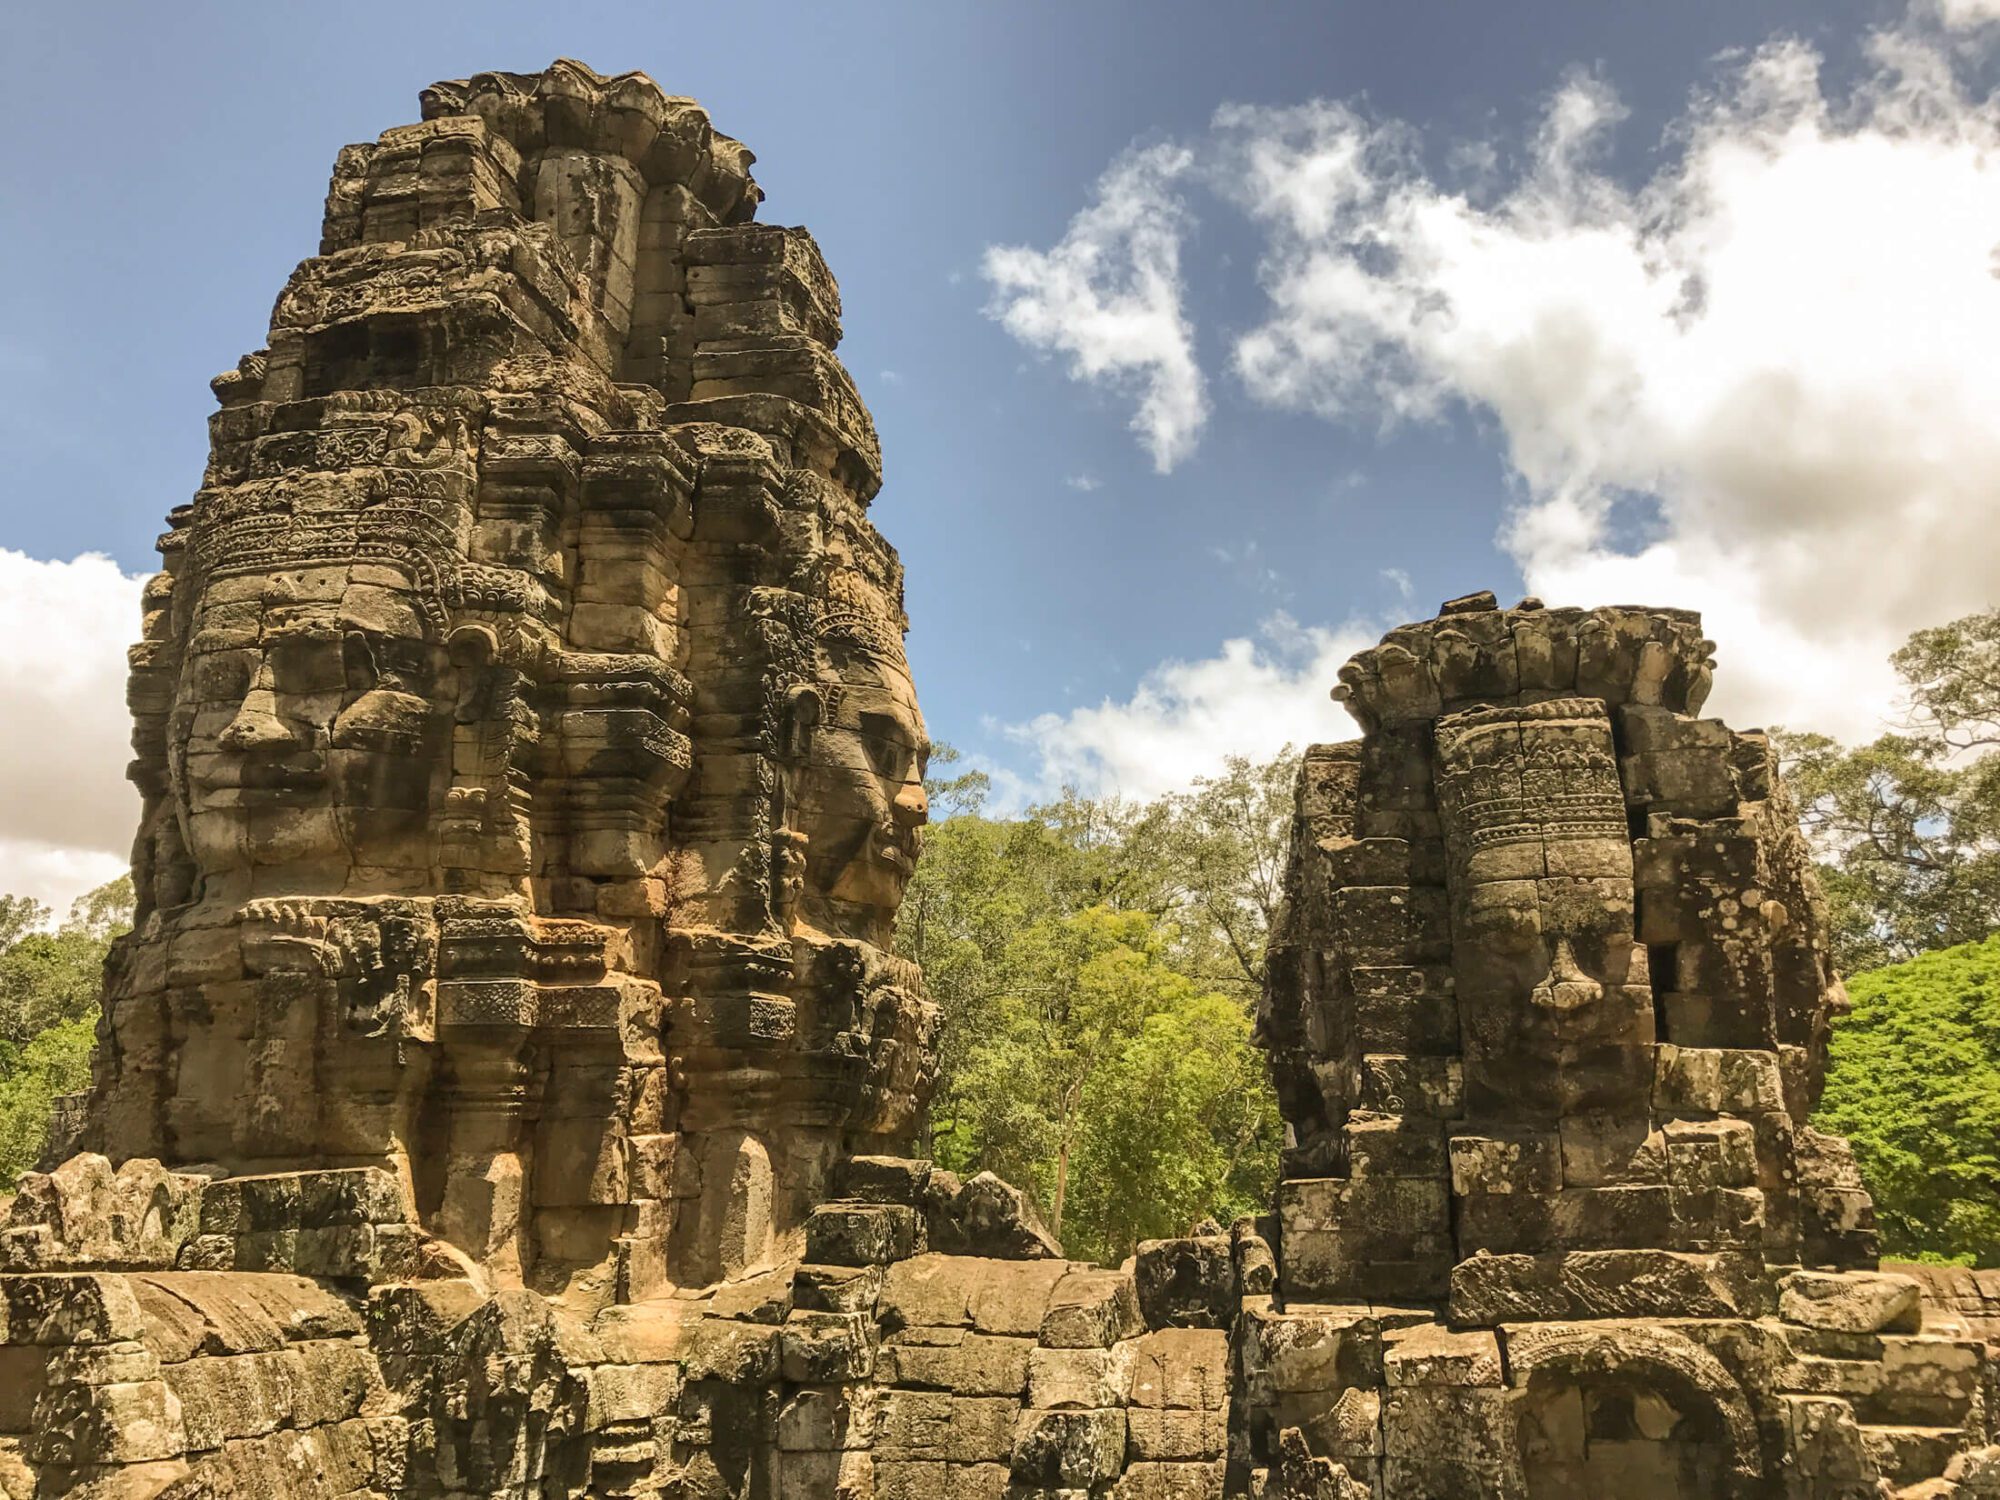
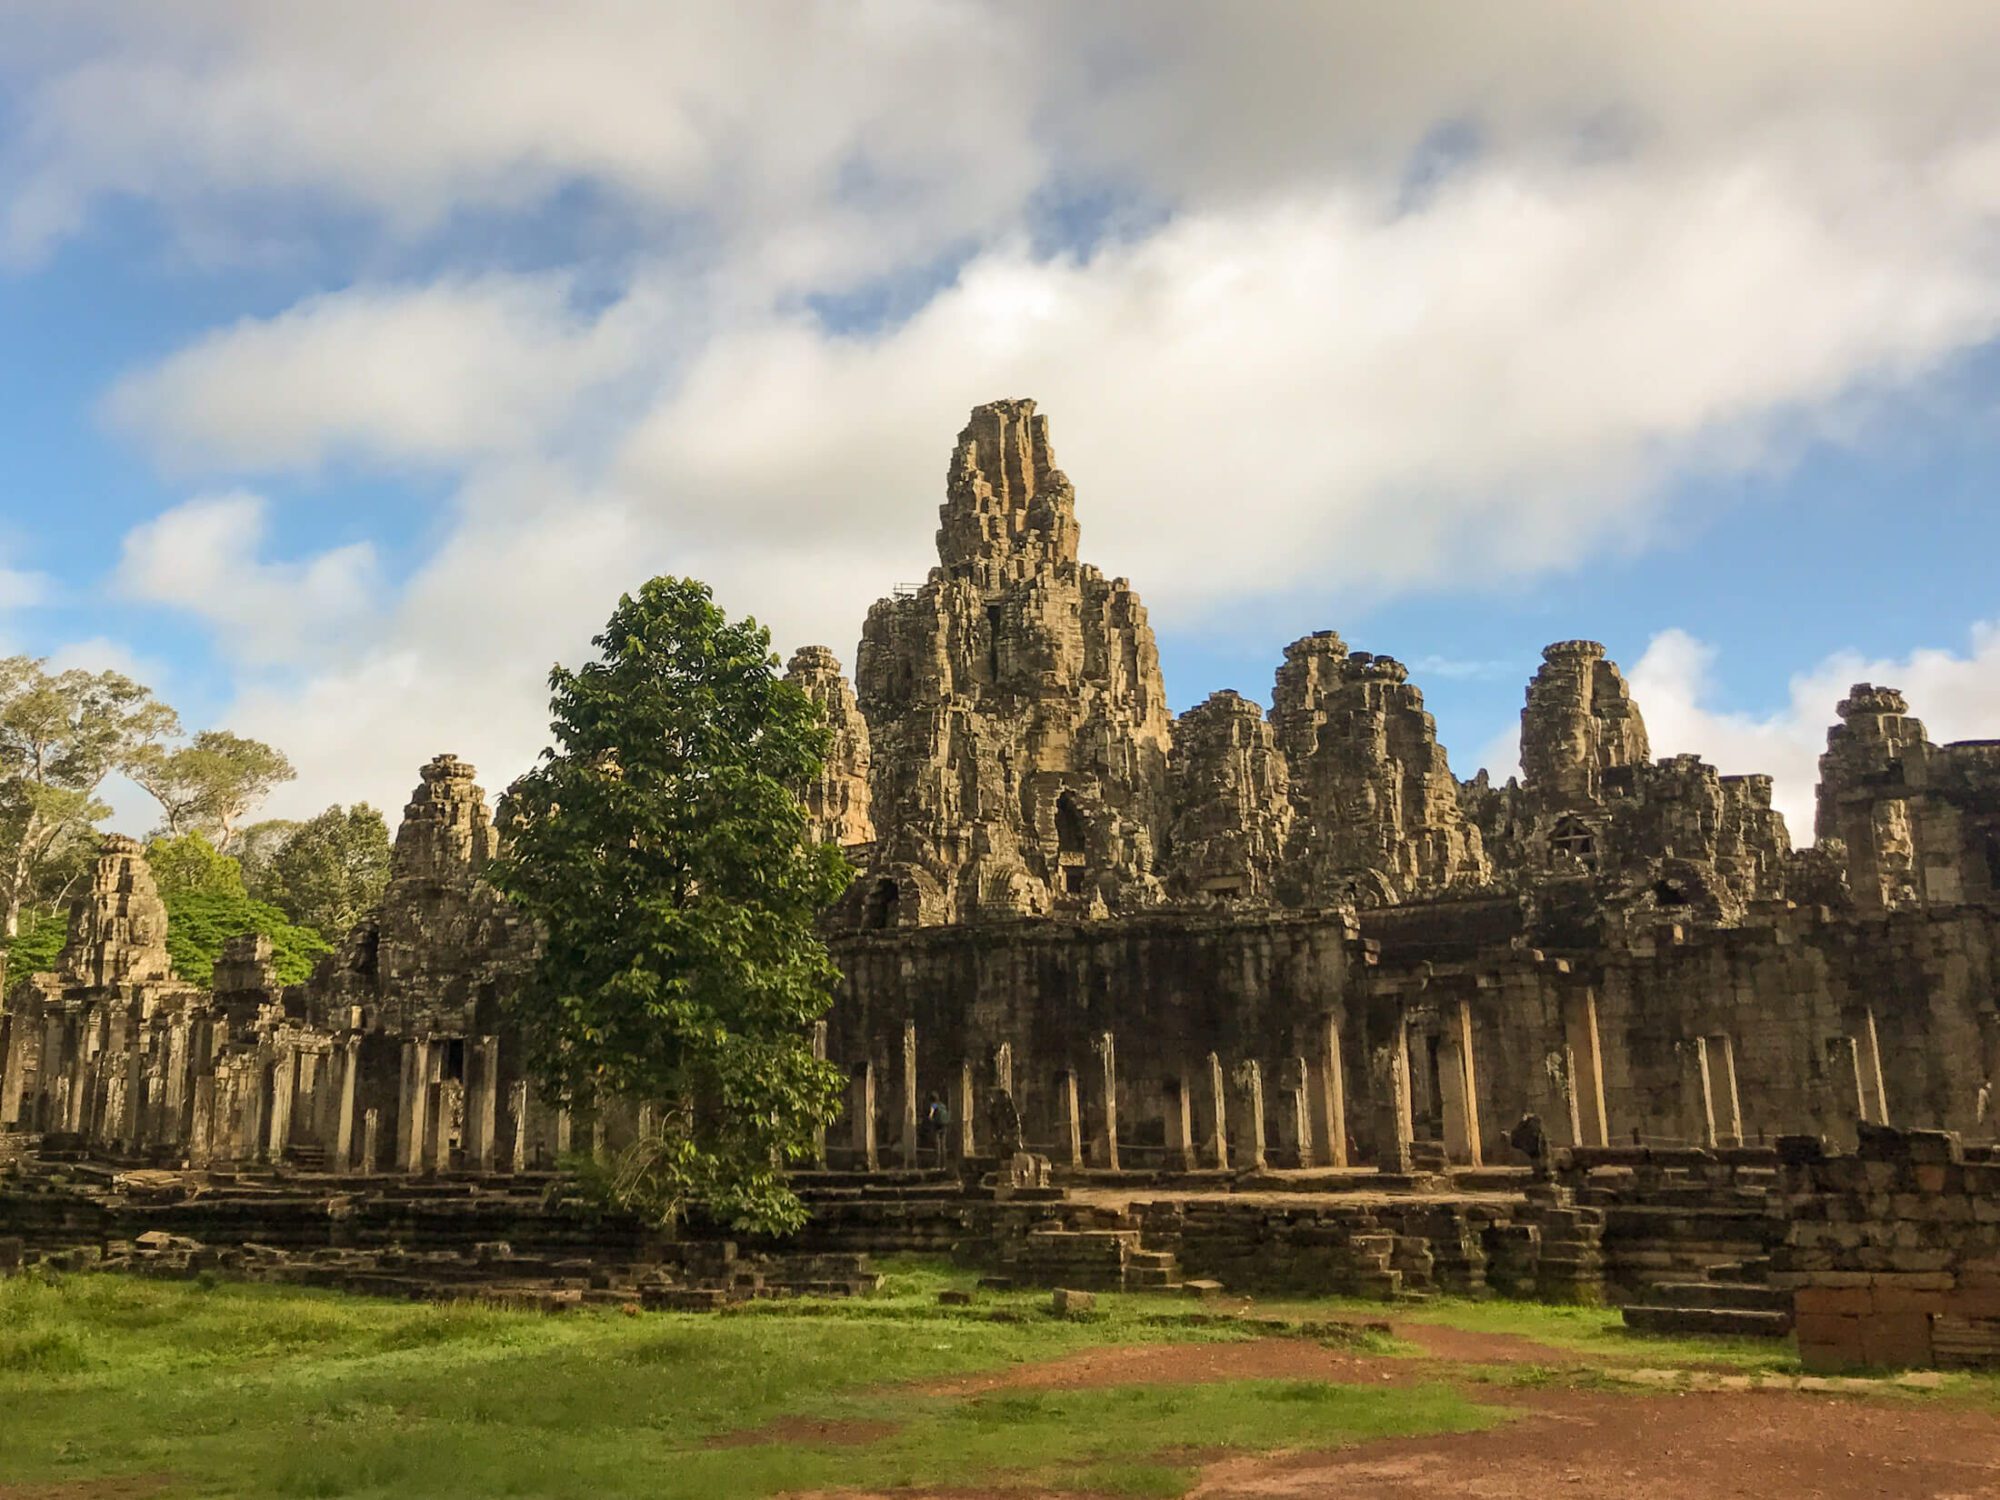
Bayon - Must See

At the heart of Angkor Thom is the Bayon. While smaller than Angkor Wat in size, the detail and 216 smiling faces adorning its towers make this temple a fan favourite.  Many theorize that the faces depict King Jayavarman VII the builder of Bayon and Angkor Thom. This temple is truly spectacular in its level of detail. The upper level is currently closed for restoration, but be sure to explore the beautiful lower levels of the Bayon to peek up at the towering faces above.

View from the Baphoun Temple in Angkor

Baphuon

Slightly north of Bayon lies the 30m tall 3-tiered Baphuon. Climb the steep steps to take in the view over Angkor Thom. As you journey around this magnificent structure and observe its details, take a moment to appreciate that you’re standing on a restoration project that was 50+ years in the making.  By the 20th century the Baphuon had almost entirely collapsed and an epic restoration project began. Over 300, 000 of the blocks were labelled and arranged around the area and a detailed catalogue created. Then the Khmer Rouge conflict followed and the plans were lost. In 1996 restoration resumed, and piece by piece the temple was reassembled over the span of 15 years.  On April 2011 the temple reopened, fully restored. Some call it one of the world’s largest puzzles, and for good reason.

Preah Palilay

Continuing north from Baphuon, the often forgotten jungle-gem of Preah Palilay is one of my most recent favourite discoveries within Angkor Thom. Tucked away behind a Buddhist monastery in the forest, this little temple has a chimney-like tower at its centre and several huge trees entangling its base stretch almost as high as the tower itself. This temple is worth a quick visit to really feel like Indiana Jones.

Banteay Kdei ​at Angkor Wat Cambodia

Banteay Kdei

Banteay Kdei is similar in style to Ta Prohm and Preah Khan, but a smaller version. It’s a charming little temple located across from Srah Srang lake.
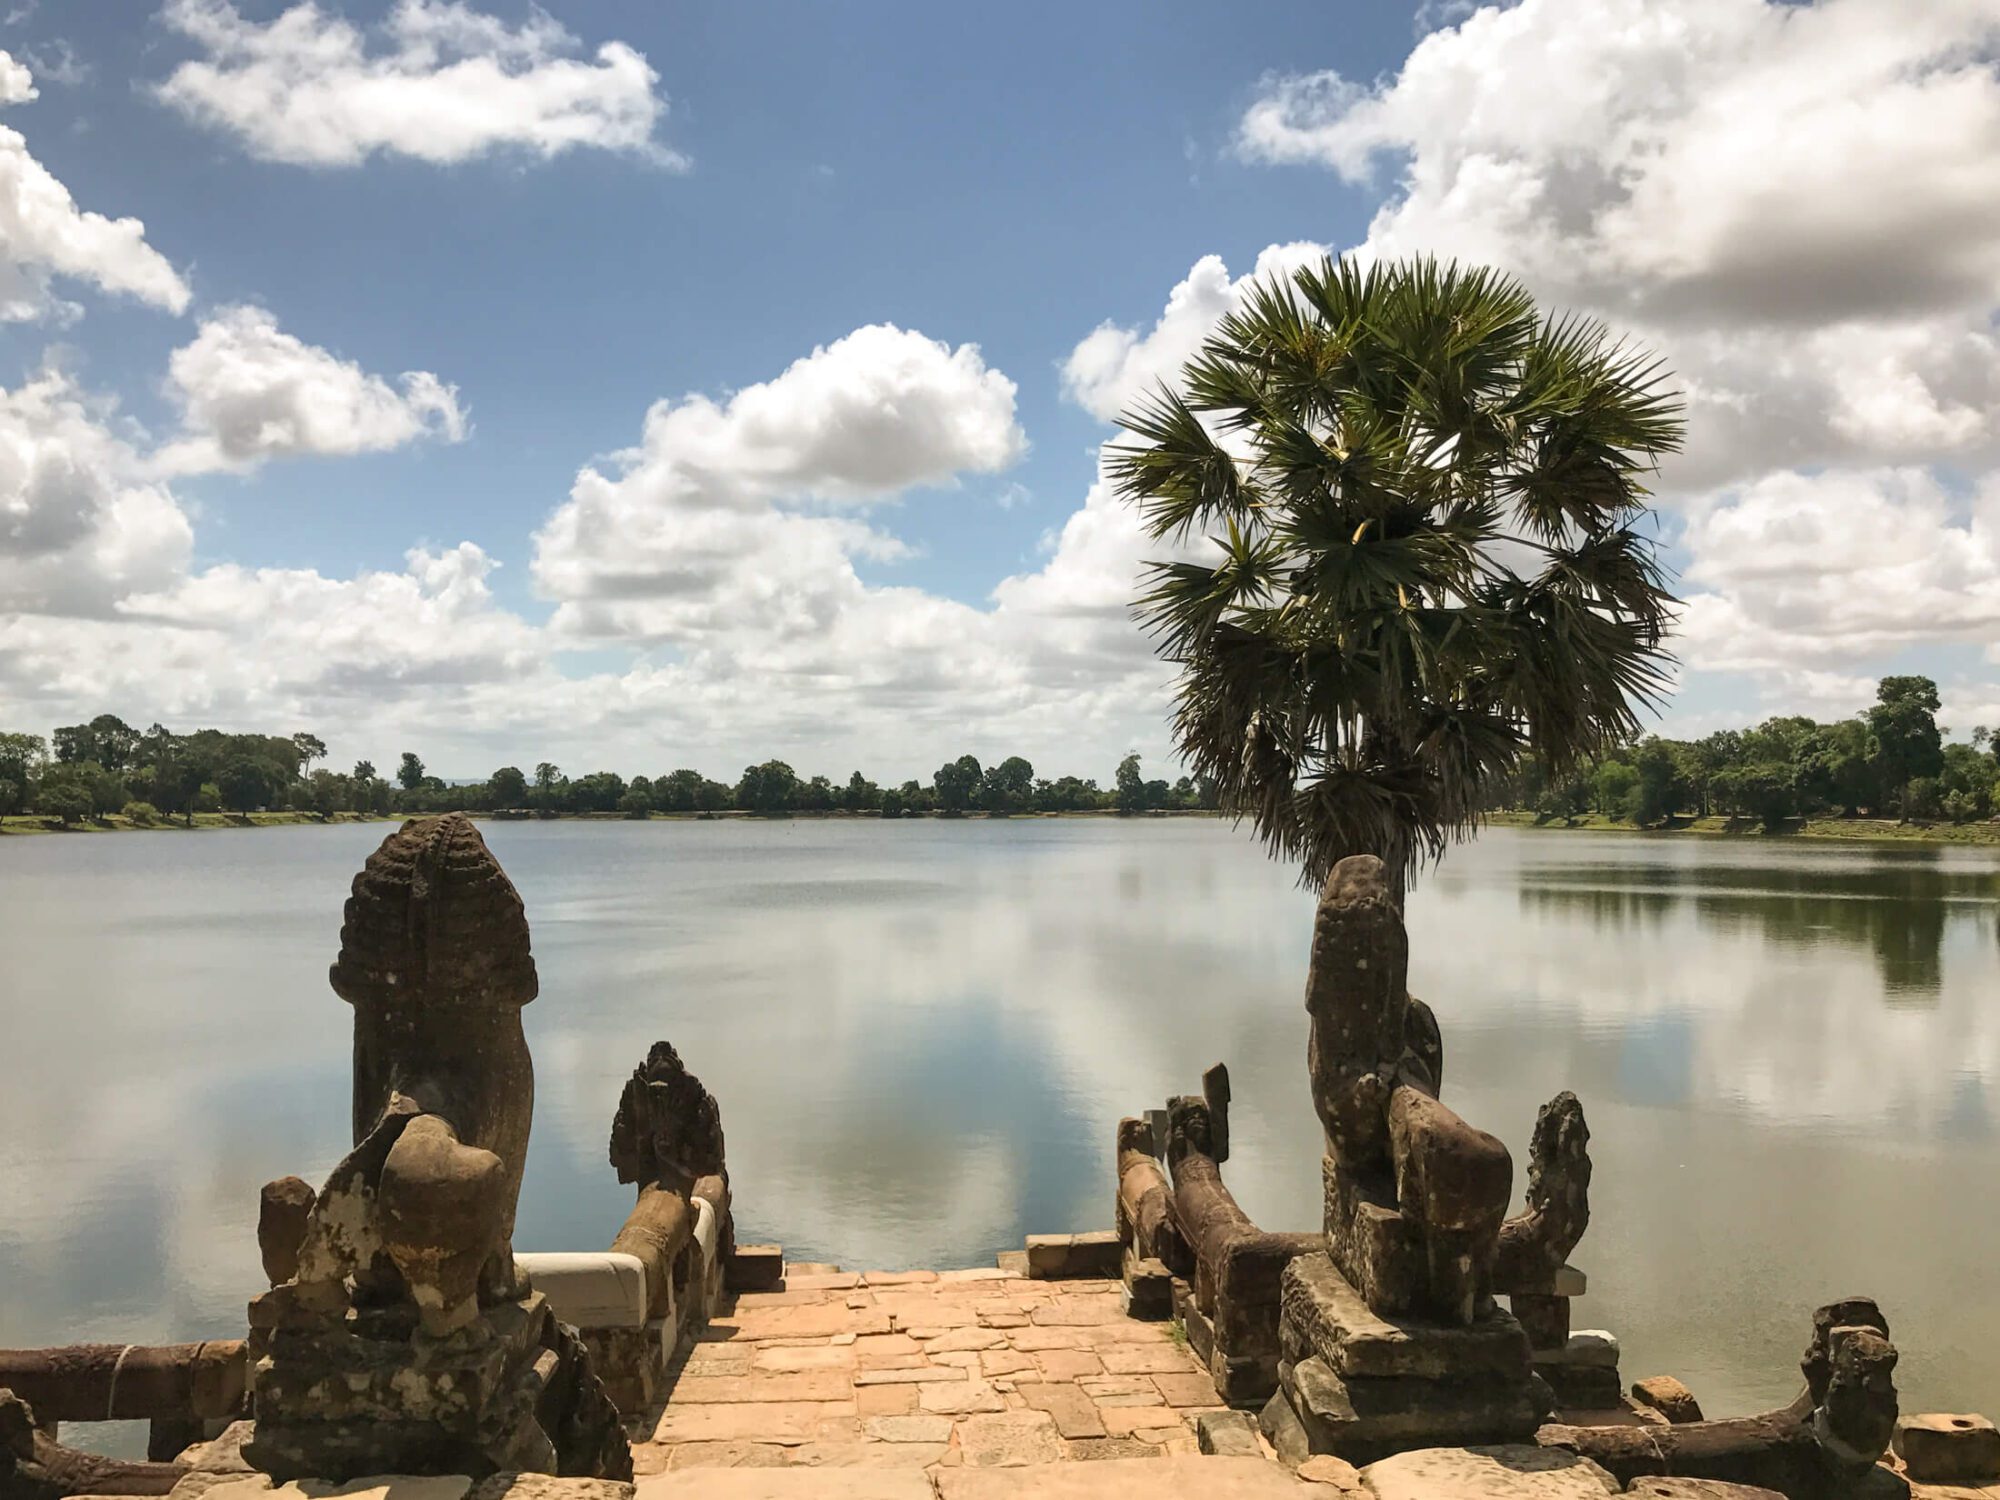
Srah Srang​ at Angkor Wat in Cambodia

Srah Srang

This large water reservoir demonstrates the engineering capabilities of the Khmer Empire. It also happens to be a nice place to watch sunrise with fewer crowds.

ta keo temple at Angkor

Ta Keo

Just outside of Angkor Thom lies Ta Keo. A mountain style temple dedicated to Shiva, Ta Keo was left unfinished in the 11th century. An inscription claims it was struck by lightning, a bad omen that led to a halt in its building, but the death of the temple’s commissioning King is another potential reason. Regardless, climbing Ta Keo’s three tiers of steep steps are worth the fear of slipping to get a nice view from the top level.
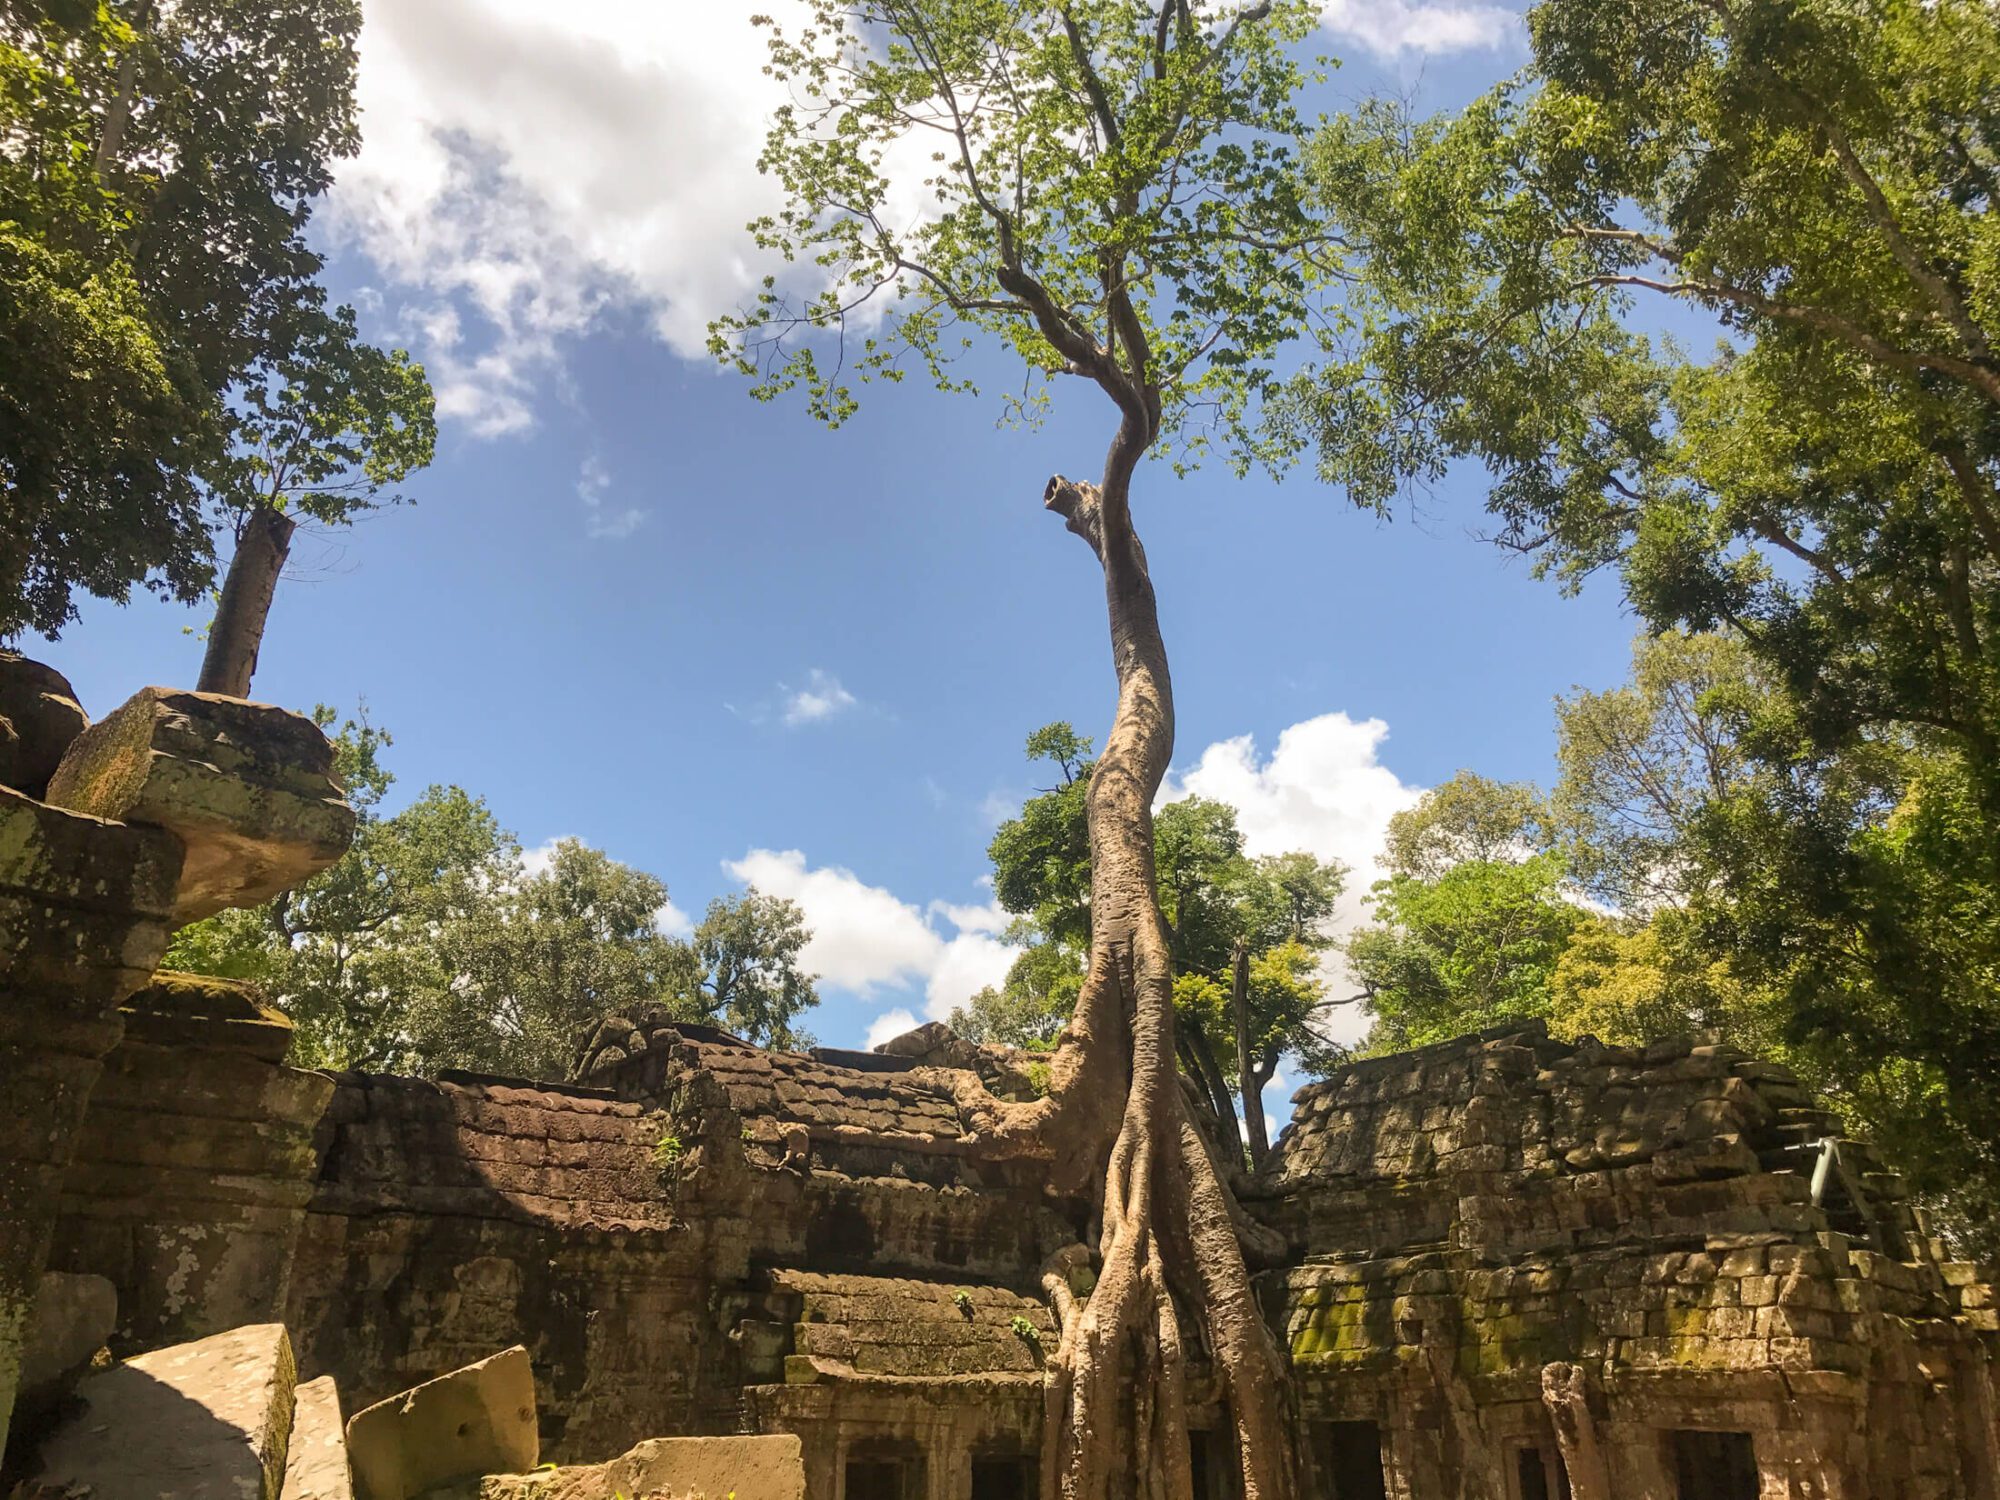
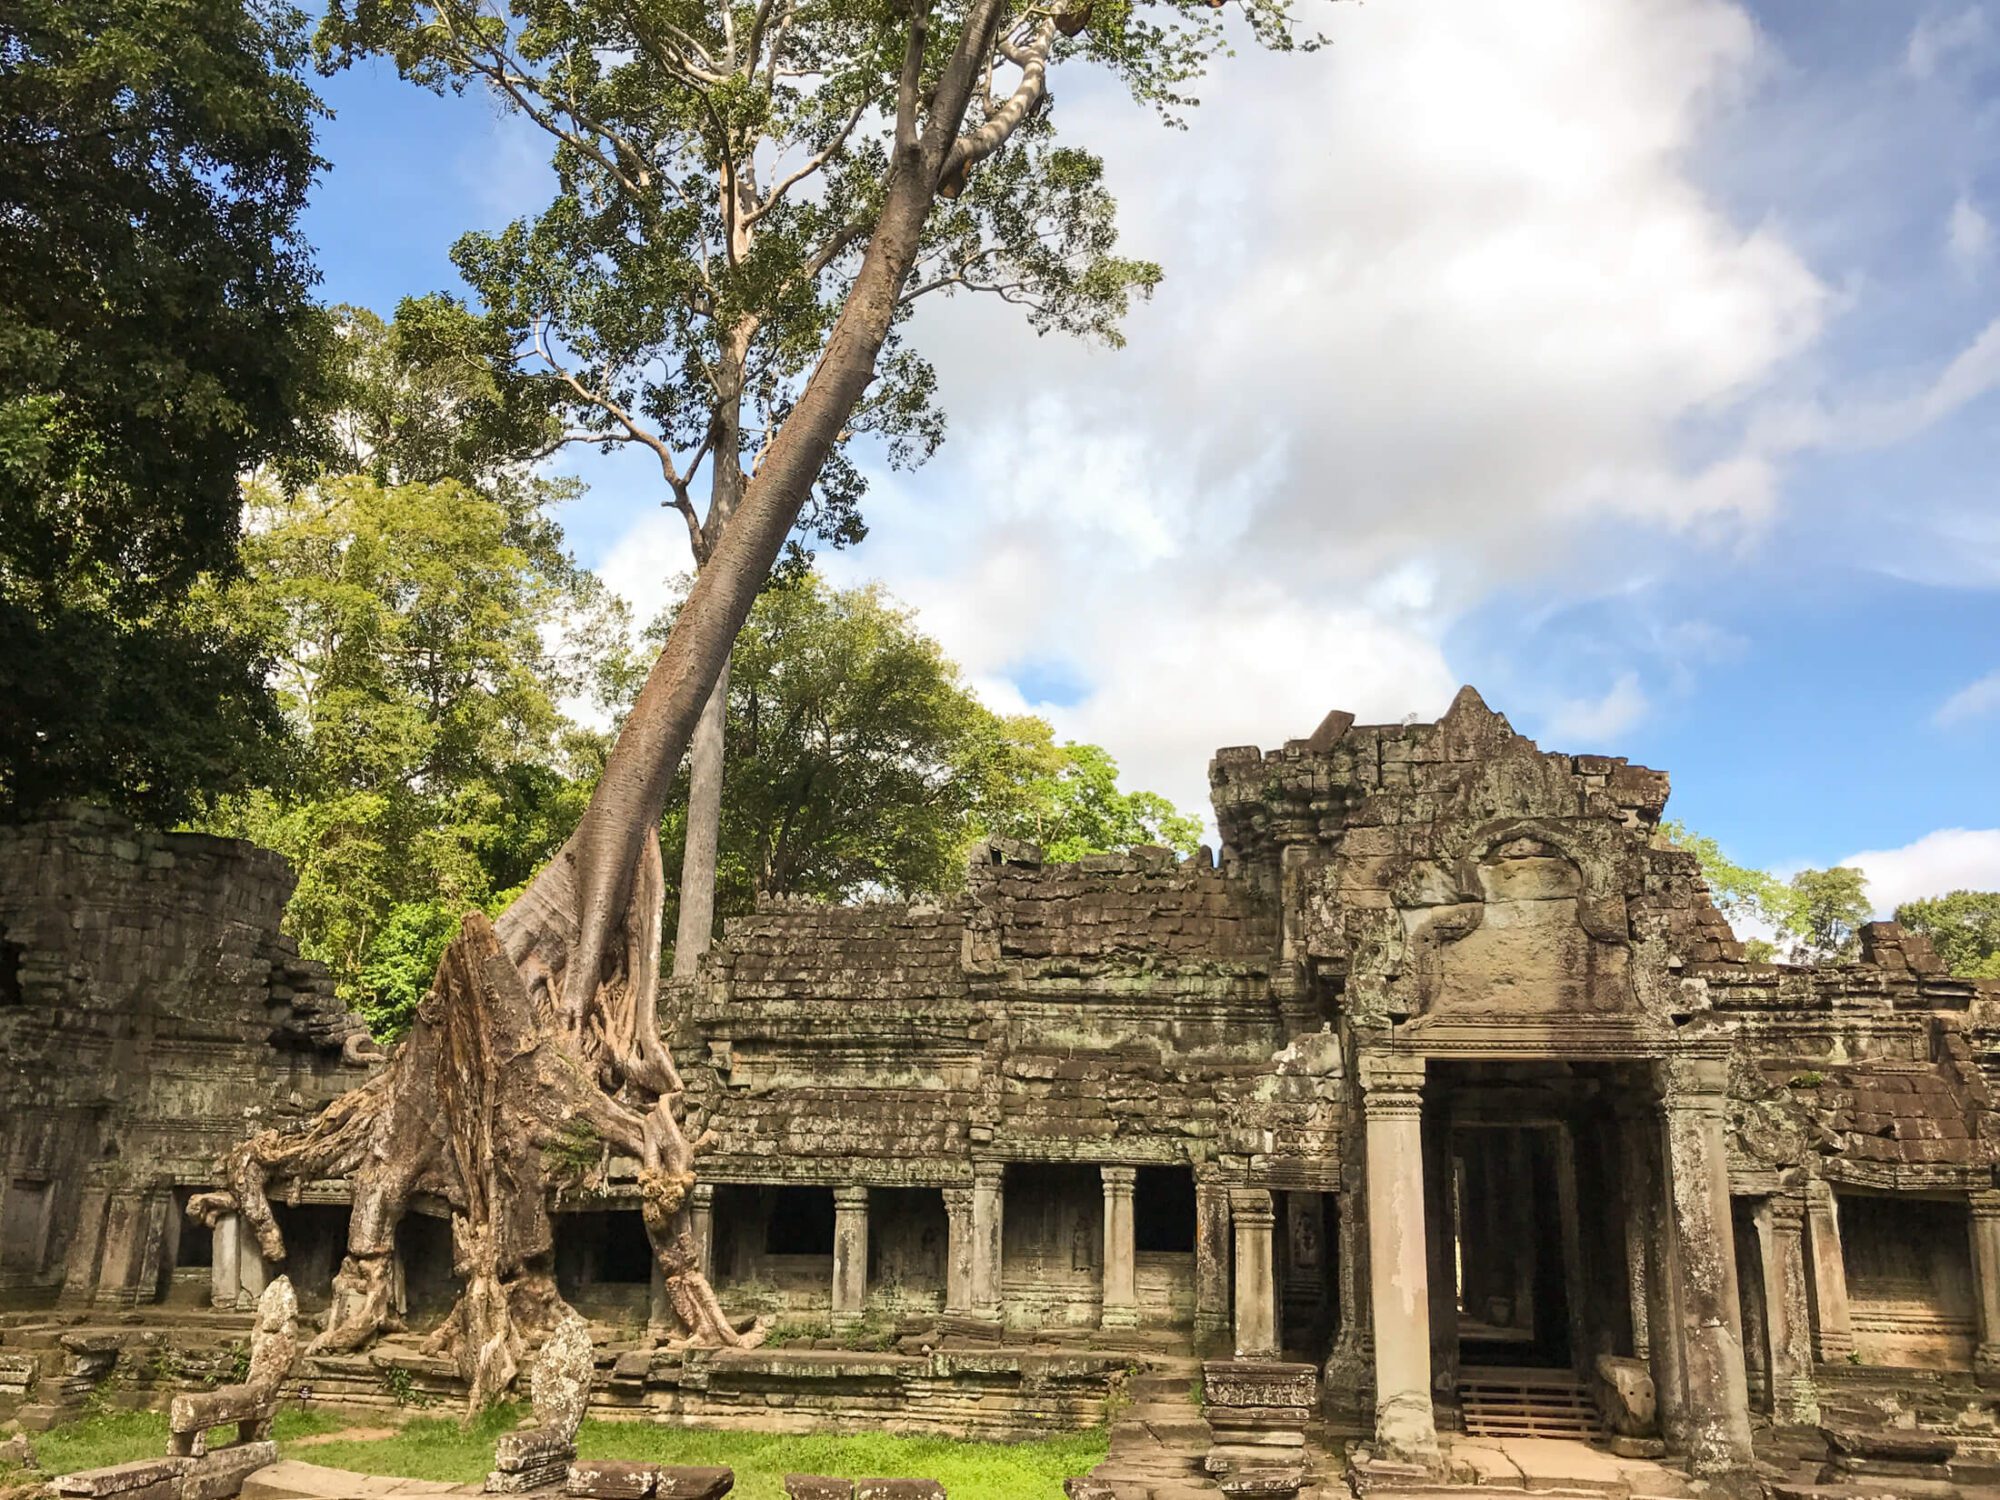
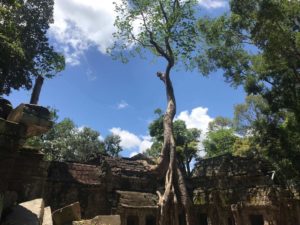
Srah Srang​

Ta Prohm - Must See

The iconic tree temple that was brought to fame by Tomb Raider lies about 1km to the east of Angkor Thom. Ta Prohm was originally built as a Mahayana Buddhist monastery and university. Today Ta Prohm is one of the most popular temples in the Angkor Archeological Park due to the fact is was left almost as it was found when rediscovered. Massive trees drape their roots over ancient stones striking up an incredible contrast of man vs. nature.

Temples to visit in the Angkor Big Loop
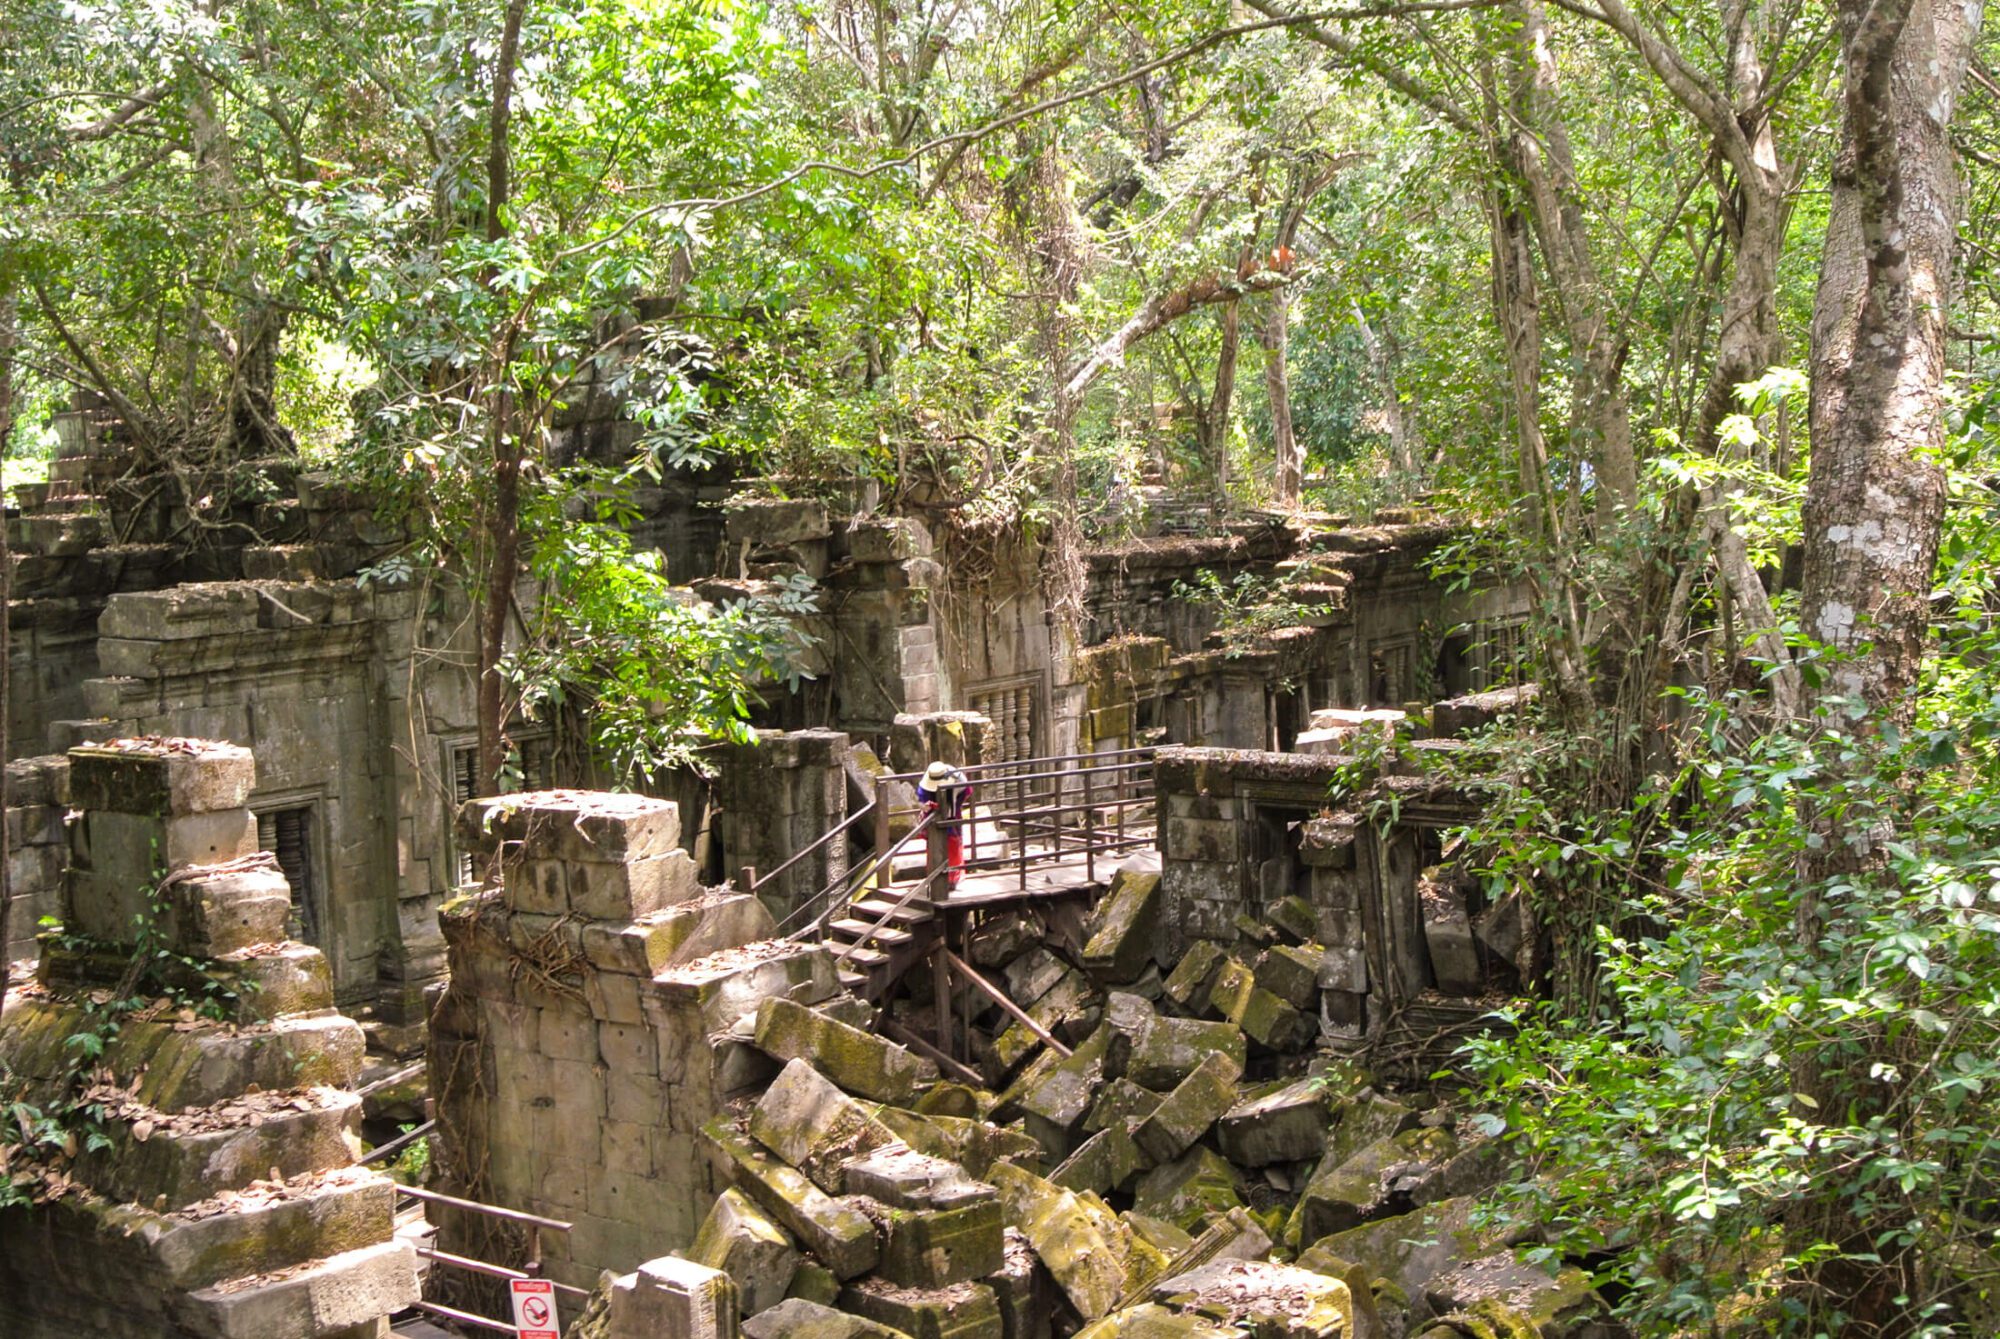
Preah Khan

Reminiscent of Ta Prohm (including the unrestored style), but with half the crowds. This temple is a must visit. Wander the many corridors and meditate among the trees. If you get your timing right, you may even have the place virtually to yourself.  

Ta Som

 A small temple in the theme of Preah Khan and Ta Prohm, Ta Som is another one of my favourite places. Tucked away in the jungle on a dirt road off of the main concrete circuit, this temple is often missed by the tourist hordes and I’ve had the place to myself on multiple occasions. It’s a beautiful place to navigate through the rubble and admire the trees soaring through and beyond its stone walls.
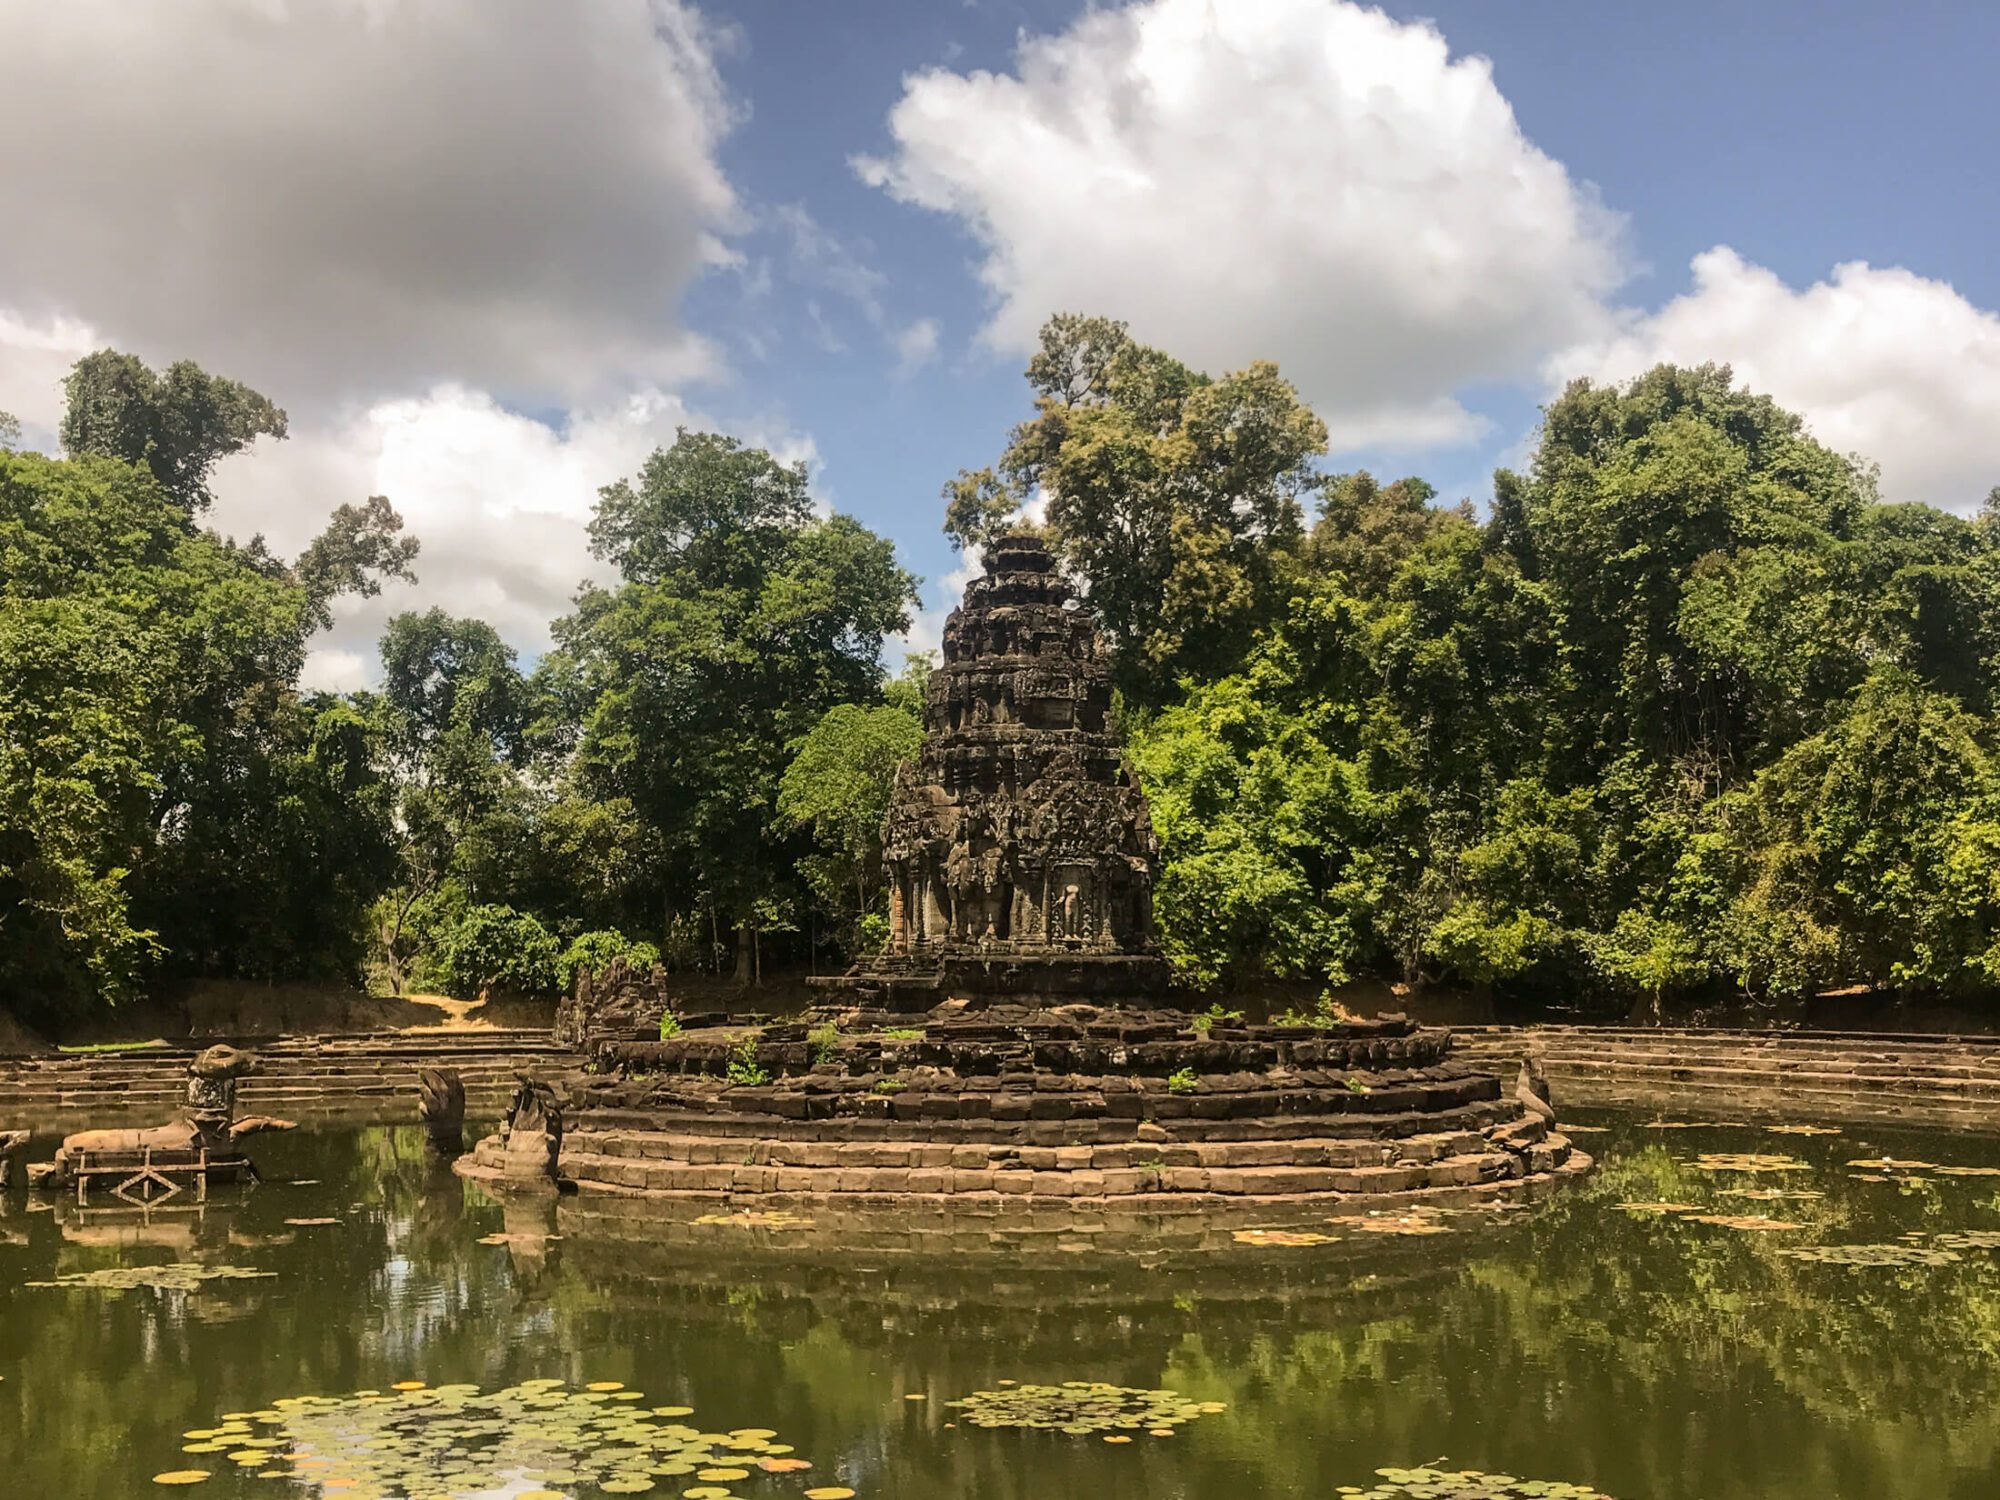
Neak Pean​ temple in Angkor

Neak Pean

Just down the road from Preah Khan lies this small and peaceful water temple. Its small size and boardwalk access can make it a little crowded during busy times, but it’s a beautiful place nonetheless.
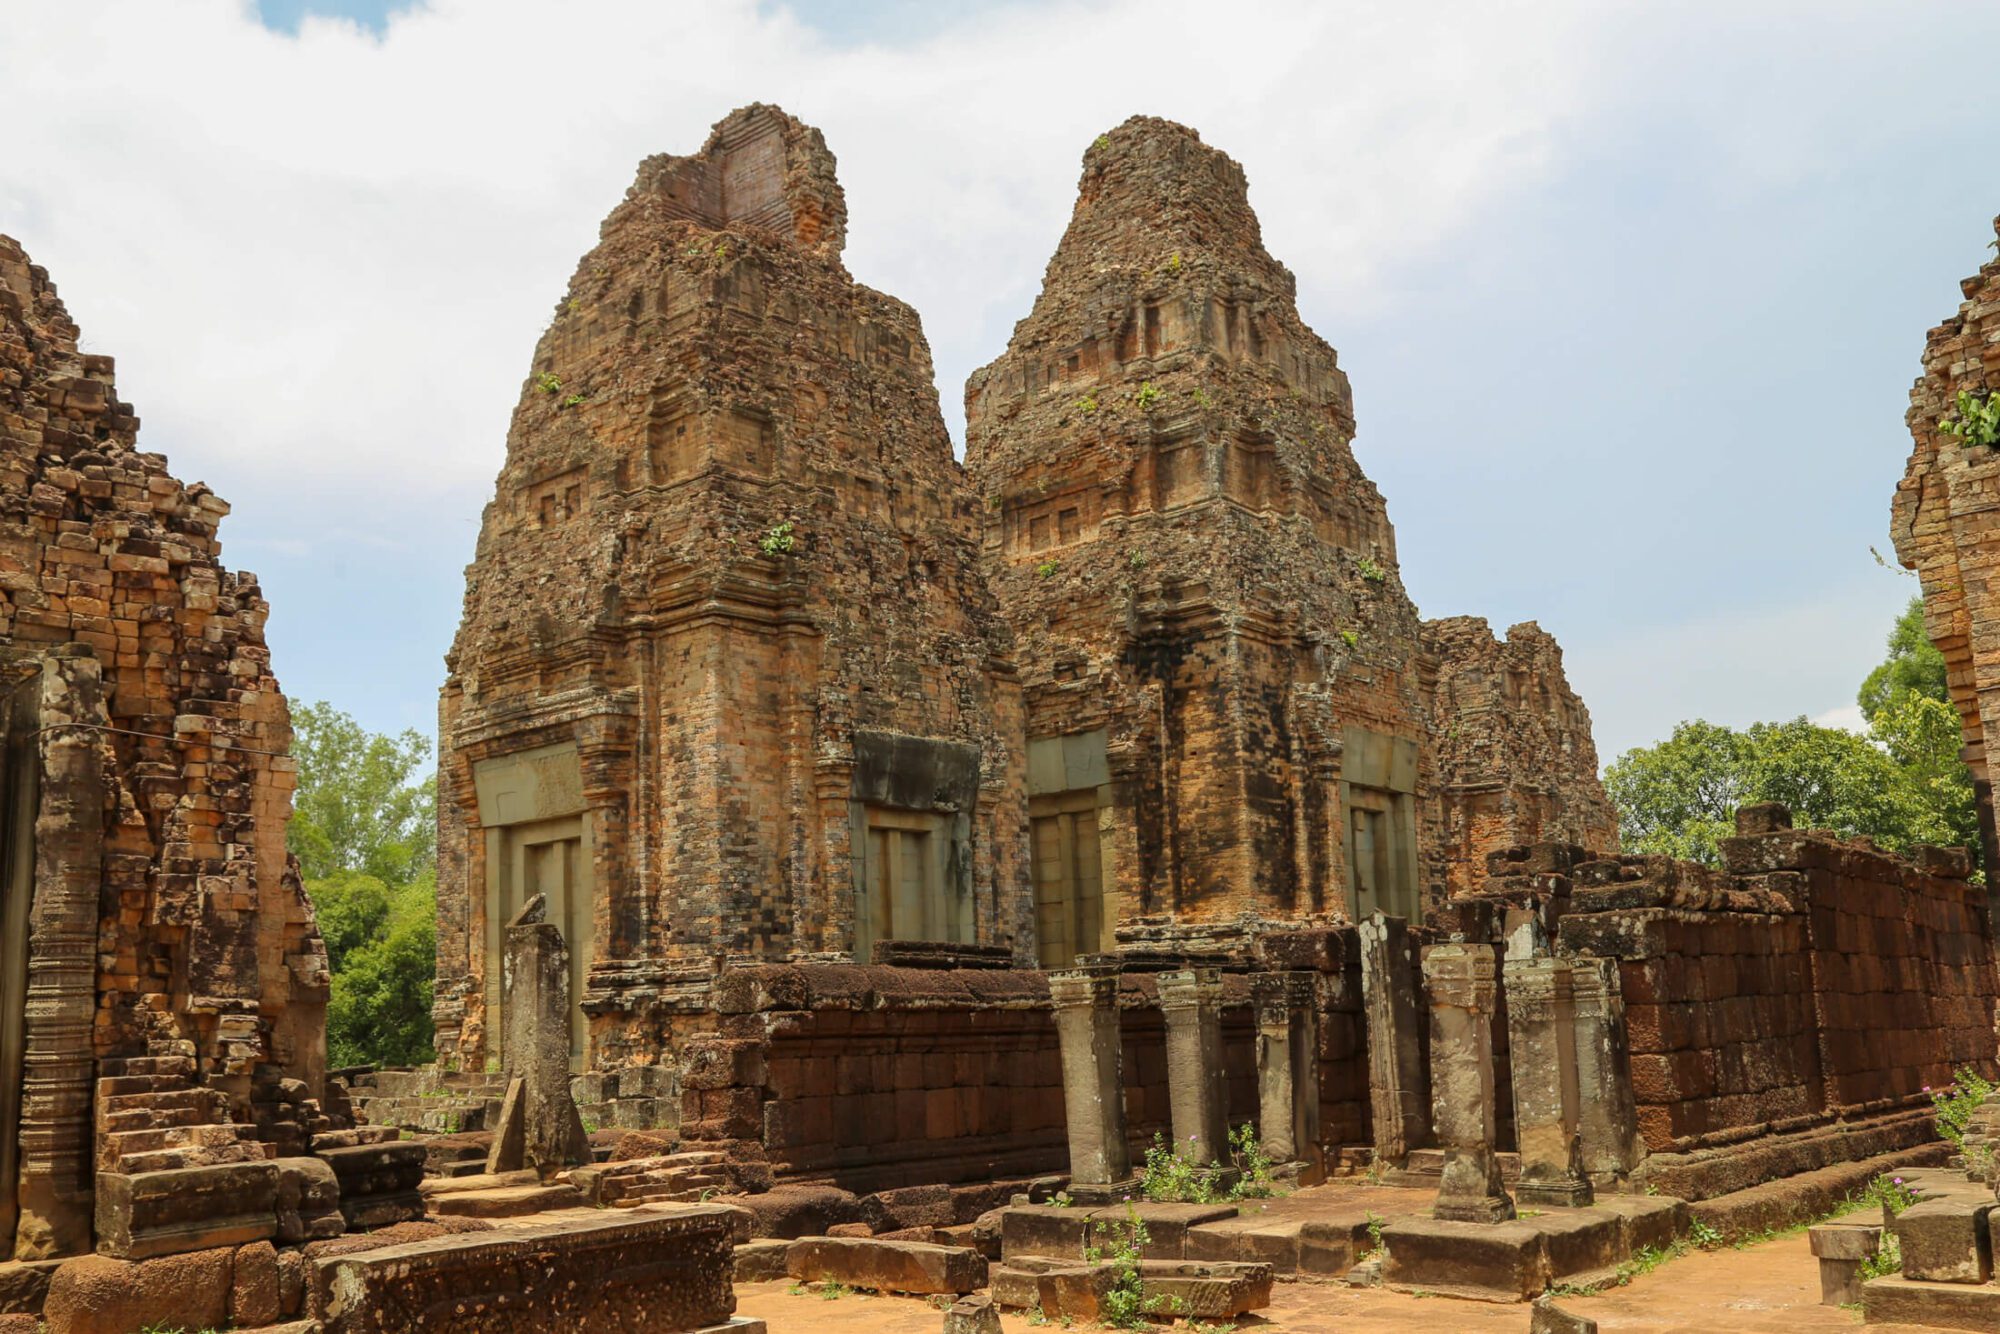
Pre Rup

A great choice for sunset if you’re looking to avoid the crowds of Phnom Bakheng, Pre Rup offers striking views over the surrounding area. Remarkably it never gets too busy here, so climb up to Pre Rup’s top tier and sit down for a bit of relaxation to absorb the beauty of the Park.

Temples to Visit Beyond the Angkor Park

Banteay Srei

 25 km northeast of Angkor Thom lies Banteay Srei. This small temple is frequently raved about for its elaborate carving that may be the most elaborate of all the temples of Angkor. You’ll need a tuk-tuk to get here, but if you have the energy after all the other temples, the carvings are worth the trip.

Find the Hidden Temples

If you’ve visiting all the temples in the big and smalll loop, go beyond the tourist track at these secret temples.  

How many days does it take to visit the Temples of Angkor?

If you’re someone that’s alright with hitting the highlights in one whirlwind of a day, it’s possible to visit Angkor Wat and the surronding temples in 1 day (see below). Most visitors looks to space their trips out over several days which allows ample time for seeing all the major temples in the Angkor Archeological Park. 

How to visit the Temples of Angkor in 1 day

Visiting Angkor in 1 day is a whirlwind, but if you’re short on time here’s my recommendation on how to do it.  If you’re biking, count on a commute of 1 hour to Angkor Wat if you’re staying on the northern side of Siem Reap, longer if you’re staying elsewhere. (Take it from someone who missed the sunrise not once but twice. Don’t miss it…)

Click the name to link back to the description above if you need to refresh your memory of a particular temple!

Angkor Wat at Sunrise

5:00 am Sunrise at Angkor Wat

7:30 am Angkor Thom

12:30 pm Lunch in Angkor Thom

1:30 pm Quick stop at Ta Keo

2:00 pm Ta Prohm

4:00 pm Banteay Kdei

5-6 pm Watch the sunset at Srah Srang or frantically back pedal through Angkor Thom and watch from the hilltop temple of Phnom Bakheng (leave early or cut Banteay Kdei if choosing this option to be sure you get a spot).

7 pm Relax. Take a deep breath. You saw the highlights of Angkor in 1 crazy day.

How to visit the Temples of Angkor in 3 days

3 days is the perfect amount of time to get the full Angkor experience. It’s a busy 3 days , but affords you the time to see all the temples you want at a somewhat relaxed pace. Here’s how to do it!

You can click the name to link back to the temple description above if you need to refresh your memory.

Temples of Angkor Itinerary Day 1: Angkor Wat & Ta Phrom

Stop 1: Angkor Wat

Start the day at the world famous Angkor Wat if you can bring yourself to wake up for the sunrise (5 am). It really is a breathtaking (albeit crowded) experience. Spend several hours admiring the vast bas-reliefs and queuing up to climb the steep steps to the upper level. Grab breakfast, a less than fantastic coffee, or the snack of your choosing at one of the many stalls/cafes along the north side of Angkor Wat.

Stop 2: Srah Srang & Banteay Kdei

 Instead of proceeding north to Angkor Thom (we’ll save that for day 2), head east to Srah Srang and Banteay Kdei. Spend some time enjoying the reservoir and small temple.

Stop 3: Ta Prohm

Explore the magnificent Ta Prohm and get to know your inner Indiana Jones or Lara Croft (among many other people trying to do the same thing).

Stop 4: Ta Keo

Take the time to climb up the Ta Keo mountain temple, before calling your first day. If you made it for the sunrise at Angkor Wat, you may be itching for a nap.  Even if you didn’t make sunrise, you’re likely going to be itching to cool down poolside with an ice cold Angkor draft, or maybe a nap and a cool down…

Temples of Angkor Itinerary Day 2: Angkor Thom

Cycle past Angkor Wat and proceed through the south gate into the great city of Angkor Thom. The temples in here don’t open until 7:30, but if you take the time to arrive around this time you’ll be rewarded with far fewer crowds than later in the day. Better yet, the morning is generally mildly cooler.

Stop 1: The Gates

No matter how you enter Angkor Thom, you’ll pass over the great moat and through an intimidating set of gates and walls towering over 9m tall.  

Stop 2: Bayon

At the centre of Angkor Thom this incredible temple can easily occupy several hours of exploration. Wander along the Terrace of the Leper King and Terrace of the Elephants, transporting yourself back to a time when this parade route would have seen kings returning victorious from battle.

Stop 3: Baphuon

Conclude your day by summiting the world’s biggest jigsaw puzzle and admiring the amazing restoration work.  

Then...

Afternoon (time dependent) in Siem Reap or visit further out Banteay Srei by tuk-tuk or motorbike.

Temples of Angkor Itinerary Day 3: The Big Circuit

An early start will once again be to your advantage. Set out biking past Angkor Wat and Angkor Thom before continuing through the north gate until you reach Preah Khan.

Stop 1: Preah Khan

Wander through this massive temple and enjoy the relative quiet compared to the temples along the small circuit. Find a spot to sit and appreciate the power of the gigantic trees that engulf this temple.

Stop 2: Neak Pean, Ta Som and Pre Rup

Once you’ve finished at Preah Khan, continue down the road, stopping at Neak Pean and wandering across the boardwalk before proceeding onwards to Ta Som and concluding at Pre Rup.

Conclude Your Time at Angkor

If you’re not templed-out, bike back past Ta Prohm and through Angkor Thom, taking the time to stop at your favourites one more time. You also have the option to climb up Phnom Bakheng and bid adieu to your time at Angkor with a view. If it’s later on in the day already, you may even want to take the time to linger and watch the sunset over Angkor Wat. The perfect conclusion to the way you started.

Final thoughts

Hopefully, you found these tips helpful for planning your trip to Angkor Wat and the temples of Angkor. Questions? Drop me a line in the comments below and I’ll do my best to help you out!

Disclaimer: Some of the links in this post are affiliate links. If you click one of the links and make a purchase we’ll earn a small commission at no cost to you. Just like the travel backpacks we build, we’re very particular . So any products or services we suggest, we test and use ourselves before making any recommendations or endorsements. 

Banana Backpacks Inc. is a participant in the Amazon Services LLC Associates Program, an affiliate advertising program designed to provide a means for sites to earn advertising fees by advertising and linking to Amazon.com

More adventures like this

Rockwall Trail | The Ultimate Guide to Hiking the Rockwall

View along the Rockwall Trail towards Floe Lake.

The Rockwall Trail is one of the Canadian Rockies’ premier backpacking trips. For 55km you’ll be treated to a seemingly unending supply of sublime Rocky Mountain scenery. You’ll camp near glacier-clad Floe Lake, hear the torrent of water crashing down from 300m+ high Helmet Falls, and be left awestruck by the Rockwall itself, an incredible expanse of 1000ft cliffs arranged almost unbroken for 30km.

Traversing three high passes in Kootenay National Park, the Rockwall delivers over 2,500 m meters of quad-burning elevation gain and over that amount of knee-crunching descent. Fortunately, five established campsites make daily mileage manageable for backpackers looking to space the hike out over a longer period of time. 

Your biggest challenge in backpacking the Rockwall is likely to be obtaining a permit and finding a way to escape the crowds on this popular hike.  Fortunately, you’ve come to the right spot!  This comprehensive guide was built on my own experience hiking the Rockwall and includes multiple itinerary options for planning your own adventure. I also reveal how I managed to hike the first 40 km without crossing paths with another hiker, while snagging a permit only days before starting my hike. 

So without further ado, let’s dive in.

** Some of the links in this post may be affiliate links. If you click one of the links and make a purchase we’ll earn a small commission at no cost to you. We’re very particular about products and we only recommend products, services, or accommodation we trust and use ourselves.**

Need to Know for Hiking the Rockwall Trail

Days Required: 2-5
Difficulty: Moderate
Distance: 54 km (34 miles)
Elevation Gain: 2,500 m ( 8, 000 ft)
Elevation Loss: 2,600 m (8, 500 ft)
Permit Required: Yes, campsites must be booked and book up fast
Designated Campsites: Yes
Navigation: Easy, well marked and maintained trail
Food Storage: Provided bear boxes
Best Campsite: Floe Lake
Worst Campsite: Helmet/Ochre Junction

Patrol Cabin on the Rockwall Trail near Helmet Falls

Things You’ll Love About This Hike

    • Sublime Rocky Mountain scenery.
    • Established campsites with bear lockers (no need to carry a bear canister), tent pads, outhouses, and tables for cooking/eating.
    • Numerous campsites allow for flexibility on trip duration and daily mileage.
    • Chance to see Rocky Mountain mega fauna (moose, grizzly bears, and mountain goats).

Things You Won’t Love About This Hike

    • Lack of solitude during peak season with large campsites.
    • Competitive permit process that requires advance trip planning during peak season.
    • 13 km shuttle required between the starting trailhead and ending trailhead.
    • Most campsites lack dynamic views from the tent pads.

What to Pack for Backpacking the Rockwall

Here’s a quick summary of what to pack for backpacking the Rockwall Trail. You’ll find a detailed breakdown of each item at the end of the post with rational, alternatives and quick links to check prices.

Don’t Forget

Essential Items

  •  

Clothing and Accessories 

Additional Items

Luxury Items (very optional)

How to Get a Permit for the Rockwall trail

Trekking the Rockwall Trail is such a memorable backpacking trip that your biggest challenge is likely to be securing the right to do it. Reservations for many dates/campsites along the Rockwall book up days after Parks Canada opens the reservation system (usually at the end of January) and no permits are allocated for walk-ups. If you’re planning on doing this trek during peak season, set a reminder and plan ahead to avoid missing out.

To get a permit for the Rockwall Trail you can either call Parks Canada at 1-877-737-3783 or use the online system for Kootenay National Park.

You must start by selecting your starting trailhead, either:

    • Paint Pots Trailhead – if heading North to South
    • Floe Lake Trailhead- if heading South to North

After picking your starting trailhead you’ll select the campsites you’ll stay at each night. For help with that, refer to the itinerary section below.

Hiker on the Rockwall trail between Helmet Falls and Tumbling Creek

When to Hike the Rockwall

The Rockwall Trail is best hiked between early-mid July and mid September. Any earlier and the passes can still be snowbound and sections can be subject to avalanche danger. Later season trips provide a means to beat the crowds and gain booking flexibility. The downside is that the days get shorter, the nights get colder, and there is a significant chance of early season storms disrupting or canceling your hike all together.

My recommendation on when to hike it

I hiked the Rockwall in early October snow-free, but the nights were chilly (woke up to significant frost) and we used up the majority of daylight hours to complete the Rockwall in 2 nights. If you get lucky with weather and are prepared for the potential of cold-weather/snow, fall can be the perfect time to take this trip and you’ll experience solitude unlike any other time of year. We hiked the first 40 km before encountering another group, camped alone at Tumbling Creek, and shared Floe lake with only 4 other parties.  With demand for reservations falling off significantly after the middle of September,  it’s possible to reserve a permit the day before starting a trip (especially during the week). If you are prepared for the challenges of late season hiking, this is the way to go, so keep your eyes glued to the forecast and make a last minute decision. You might end up having this incredible hike all to yourself!  

How to Get to the Trailheads - Shuttles & Transportation

The Rockwall Trail starts from either Floe Lake Trailhead or Paint Pots Trailhead in Kootenay National Park, approximately 50 km from Banff (Paint Pots) and 175 km from the city of Calgary. The Floe Lake and Paint Pots trailheads are 13 km apart on the Kootenay Parkway Highway 93, making transportation between trailheads a required annoyance. Your options for dealing with this are as follows:


    • Take 2 cars and leave one at each trailhead.
    • Hitchhike. If you’re electing this option, the best bet is to start your trip with the hitchhike. You get it over with and are more likely to get picked up as you look all fresh and clean! Consider making a small sign on a piece of paper that says “Hiker: only going 13 km” (helps take the edge off by helping drivers realize that even if you’re a weirdo, they won’t be stuck with you for long).
    • Bet on your social skills and charm (busy season only). Meet someone on the trail or at the parking lot that will drive you to your car. Bring desirable backpacking bribes (think dessert, candy, pocket cocktails) to help lubricate negotiations.
    • Convince a friend, spouse, parent, or lover to drop you off and pick you up! Just make sure you arrange all the details in advance as there is no cell service!

Which Direction Should You Hike the Rockwall Trail?

The Rockwall can be hiked:

    •  North to South starting at Paint Pots trailhead and ending at Floe Lake trailhead, or
    •  South to North starting at Paint Pots and ending at Floe Lake trailhead.

Quite frankly, you should be happy if you get a permit going either direction given how hard it is to snag sites. The hike is awesome no matter how you do it! Floe Lake tends to be the most popular campsite and as a result your itinerary may be dictated by the available dates for camping here.  

I hiked the Rockwall North to South and if I had to choose I’d do that again. Doing it this way lets you enjoy camping at Floe Lake on your last night. Floe Lake is the pièce de résistance of the Rockwall campsites, and enjoying sunrise here is an epic way to cap your trip.

How Long Does it Take to Hike the Rockwall?

The Rockwall can be backpacked in 2-5 days depending on how much mileage you’d like to cover each day. In my opinion the sweet spot for hiking the Rockwall is 2-3 nights for reasonably conditioned hikers who are mindful of their pack weight.  You’ll start early and typically finish in the later afternoon. You’ll have full days of hiking, but leave plenty of time for photos, snack breaks, and lunch.  If you’re someone that likes slow mornings or lazing around camp in the afternoon, go for 4 nights – that’ll be perfect. 

The shorter you go for, the more important it is to be cognizant of your pack weight and what you’re packing (see the what to pack section). Pack weight makes a huge difference in your enjoyment levels during long days on the trail.

Rockwall Trail Sections

The Rockwall Trail is best thought of as 5 unique sections. Here’s a quick breakdown of each section described for a North to South trip (Paint Pots to Floe Lake Trailhead). If you’re going South to North, use your imagination and remember uphill changes to downhill!  😉

Helmet Falls in Kootenay National Park

Paint Pots Trailhead to Helmet Falls - 14.2 km

14.2 KM - 500 M elevation gain / 200 M elevation loss

The opening section of the Rockwall takes you through lush forest until you pass the Helmet-Ochre junction campground at 8.2 km.  Shortly after Helmet-Ochre Campground the trail swiftly gains elevation for about a kilometer before continuing at a more gradual pace up to the Helmet Falls Campground.  By the time you reach this campground, you’re 14 km into your trip and starting to get a real taste of some of the scenery to come! The campground is situated between the tributaries of Helmet Creek and 350m Helmet Falls crashes down in the distance. Take a breath, soak it all in, and taste that mountain air with an essence of waterfall mist! Yum!  A short side trip takes you closer to the base of the falls for a closer look. Stay here for the night if it’s on the itinerary, if not, proceed to the next level.

Heading towards Rockwall Pass

Helmet Falls to Tumbling Creek over Rockwall Pass- 12.3 KM

12.3 KM - 700 M elevation gain / 500 M elevation loss

After departing the Helmet Creek Campground the trail begins an ascent, climbing over 400m in just over 3 km to Limestone Summit.  This hard work gives you your first close-up of the incredible Rockwall. Take it in and enjoy. Erosive forces have been working relentlessly for millennia  to create this view for you and your Instagram followers!  Show ‘em some love and savor it! After your climb, you’ll descend towards the south fork of Helmet Creek before climbing again to Rockwall Pass and eventually passing the junction for Wolverine Pass where a short side trip leads to the border of Kootenay National Park. The scenery along this section is absolutely stunning as you view the Rockwall, alpine meadows and glaciers. Shortly after the junction you’ll make a short but steep descent down to Tumbling Creek Campground with views towards Tumbling Glacier and the Rockwall along the way. The campground is in the trees near the creek. 

views to tumbling glacier on the way to Tumbling Pass

Tumbling Creek to Numa Creek over Tumbling Pass - 7.9 km

7.9 KM - 400 M elevation gain / 700 M elevation loss

After departing the campground and crossing Tumbling Creek, you’ll fire up the ol’ pegs and begin your ascent up to Tumbling pass gaining 350m in 2.5 km. Go legs go! Walking through subalpine forest, you’ll have views of Tumbling Glacier. After reaching the height of the pass you’ll descend through a boulder meadow before following numerous switchbacks alongside tributaries fed from the glacier above, fording the water on numerous occasions. As you descend and hear the roar of Numa Creek grow louder, shrubbery begins to surround the trail. Make lots of noise here to avoid sneaking up on a bear enjoying the buffet of berries that can be found in this section. After walking through some lush vegetation that makes you feel as if you’re hiking in the Pacific Northwest, you’ll arrive at Numa Creek Campsite. 

Numa Pass at the height of the Rockwall Trail

Numa Creek to Floe Lake over Numa Pass - 9.2 km

9.4 KM - 800 M elevation gain / 300 M elevation loss

From Numa Creek Campsite, you’ll cross a log bridge over Numa Creek and hike through lush vegetation adjoining multiple avalanche chutes before beginning the climb to Numa Pass, the highest point on the Rockwall Trail. The ascent to Numa Pass is strenuous with 800m of elevation gain in under 7 km. As you near the top the landscape changes from alpine forest to a barren alpine tundra. From Numa Pass incredible vistas greet your weary legs including a glimpse of Mt. Temple to the North. After taking in the view from the pass, continue down through the alpine as you wind through larch glades and seasonal wildflower meadows, noticing as Floe Lake comes closer into view below you.  Once you reach Floe Lake there are a couple of frequently occupied tent pads near the water, unfortunately the  other sites lack the same view out to the lake. Fortunately, the cooking area is set adjacent to the lake and provides great consolation. Don’t forget to set your alarm, sunrise here is a spectacle to behold!

Floe Lake on the Rockwall Trail

Floe Lake to Floe Lake Trailhead - 10.5 km

9.4 KM - 150 M elevation gain / 900 M elevation loss

After walking for several hundred meters through the subalpine forest surrounding the magnificent Floe Lake, the trail drops sharply for the next 2.5 km, quickly losing 400m.  For the final 8 km you’ll find yourself walking through the remnants of the substantial forest fire that burned through Kootenay National Park in 2003. Heed extra caution on windy days as some of these trees have precarious leans to them. Take note of the incredible regrowth that has already occurred in this burned area and observe the significant logjams that have funneled their way into the valley and Floe Creek below. To wrap the hike you’ll walk alongside a beautiful canyon eroded by the Vermillion River, before crossing to the Floe Lake Trailhead. Give your hiking companions (if applicable) a high five! You did it!!  

View along the Rockwall Trail towards Floe Lake.

Rockwall Itinerary Options

Here’s your Rockwall itinerary buffet! No matter your time or desired mileage level there should be an itinerary that suits your palate.  I’ve also indicated which day you’re likely to find the most challenging. 

Campsites on the Rockwall Trail

To make your reservation for hiking the Rockwall you’ll need to select a campsite for each night. There are 5 campsites along the Rockwall Trail.  Listed in order from North to South they are:

    • Helmet-Ochre Junction Campground*
    • Helmet Falls Campground
    • Tumbling Creek Campground
    • Numa Creek Campground
    • Floe Lake Campground

*None of the below itineraries include the Helment-Ochre Junction Campground. In my opinion, staying at this site provides limited benefit as Helmet Falls to the Paint Pots Trailhead is not a challenge for most hikers looking to complete the Rockwall in its entirety. In a pinch, those looking to spend 4 nights on the trail could use this site as a substitute for Helmet Falls if that was booked. 

Rockwall Trail in 1 Night /2 Days

Crazy?? Maybe! But trail runners slay this dragon of hike in a day. So, the Rockwall Trail is doable as a 1 night / 2 day backpacking trip if that’s all your schedule affords. To make this happen, you’ll need to travel light and be comfortable hiking 30 km+ days with significant elevation changes. Your pack weight should be under 20 lbs. I’d also suggest doing this early in the season (July) so that the long daylight hours are on your side and you can hike from dawn to dusk if needed. 

Now that the disclaimer is out of the way, time to pick your poison:

Starting at Paint Pots Trailhead

Option 1
    • Day 1: Paint Pots Trailhead to Tumbling Creek (26.5 km) 
    • Day 2: Tumbling Creek to Floe Lake Trailhead (27.6 km) – Hardest Day

Notes: This option splits the mileage evenly between the two days with Day 2 being significantly more challenging as you’ll combine both Tumbling Pass and Numa Pass in one day before making the knee-crunching descent from Floe Lake to the parking lot.

Option 2
    • Day 1: Paint Pots Trailhead to Numa Creek (34.4 km) – Hardest Day
    • Day 2: Numa Creek to Floe Lake Trailhead (19.7 km)

Notes: A huge Day 1 is a great way to go as you benefit from fresh legs and guaranteed blister-free feet!  Plus, by doing it this way, you group the two easier passes together (Rockwall Pass and Tumbling Pass). This itinerary also saves the most physically strenuous pass (Numa Creek Campsite to Numa Pass) for the lower mileage day and provides ample time for a lunch stop at Flow Lake prior to making the big descent down to the trailhead.

Starting at Floe Lake Trailhead

Option 1
    • Day 1: Floe Lake Trailhead to Numa Creek (19.7 km)
    • Day 2: Numa Creek to Paint Pots (34.4 km) – Hardest Day

Notes: For a 1-night option going South to North, this is the option that I’d pick as the first day is shorter, but includes a significant amount of elevation delta going directly from the Floe Lake Trailhead to the trail’s high point (Numa Pass) then making the big drop down to Numa Creek. The second day will be long, but the most challenging ascent will come first thing as you grind up Tumbling pass from Numa Creek Campground. The final 14 km from Helmet Falls to the trailhead will fly by. 

Option 2
    • Day 1: Floe Lake Trailhead (27.6 km) to Tumbling Creek – Hardest Day
    • Day 2: Tumbling Creek to Paint Pots Trailhead (26.5 km) 

Notes: Despite evening out the mileage, Day 1 will be brutal on this trip as you ascend the trail’s two longest climbs back-to-back while squishing the epic descent from Numa Pass to Numa Creek in the middle. The upside? Day 2 should feel like a breeze after making the early morning climb from Tumbling creek to Rockwall pass, so you can throw it into cruise all the way down.

hiker crosses Numa Creek on the rockwall trail

Rockwall Trail in 2 Nights/3 Days

Anytime you can fit a trip like the Rockwall into an extended weekend, you go for it right? If that’s your motto and you’re an in-shape backpacker that knows your limits, this is probably the trip length for you. When I hiked the Rockwall this is how I did it (North-South) and if I had a do over, I wouldn’t change a thing! This trip duration makes for a couple full days, but you have ample time to enjoy the views without feeling rushed and you’re left with an easy half-day conclusion to wrap it up. 

Starting at Paint Pots Trailhead

    • Day 1: Paint Pots Trailhead to Tumbling Creek (26.5 km) – Hardest Day
    • Day 2: Tumbling Creek to Floe Lake (17.1 km) 
    • Day 3: Floe Lake to Floe Lake Trailhead (10.5 km)

Notes: This is the exact itinerary that I hiked. Day 1 was long, but manageable. Day 2 felt longer than the mileage would suggest given the significant elevation gain over Tumbling Pass and Numa Pass before reaching Floe Lake. The hike out from Floe Lake flew by in the morning of the last day.

Starting at Floe Lake Trailhead

    • Day 1: Floe Lake Trailhead to Numa Creek (19.7 km) – Tie Hardest
    • Day 2: Numa Creek to Helmet Falls (20.2 km) – Tie Hardest
    • Day 3: Helmet Falls to Paint Pots Trailhead (14.2 km)

Notes: This itinerary has been included as an option, but I don’t recommend this itinerary unless you have no other options for the following reasons:

    1. You have limited time to enjoy the scenery around Floe Lake.
    2. The section from Helmet Falls to the Paint Pots Trailhead isn’t nearly as enjoyable of a denouement as the descent from Floe Lake.
Heading towards Numa Pass on the Rockwall Trail

Rockwall Trail in 3 Nights/4 Days

Completing this hike in 3 nights and 4 days requires one longer day, but allows for plenty of time to relax at campsites and enjoy the Rockwall at a more leisurely pace. Unfortunately, this itinerary is slightly awkward, as you’re still stuck with one longish day that will include two passes. 

Starting at Paint Pots Trailhead

    • Day 1: Paint Pots Trailhead to Helmet Falls (14.2 km)
    • Day 2: Helmet Falls to Numa Creek (20.2 km) – Hardest Day
    • Day 3: Numa Creek to Floe Lake (9.3 km)
    • Day 4: Floe Lake to Floe Lake Trailhead (10.5 km)  

Notes: Day 2 will be the most challenging as you combine Rockwall Pass and Tumbling Pass in one day. Both are manageable ascents taken in this direction. You’re likely to find the long descent from Tumbling Pass to Numa Creek tiring at the end of a long day. Day 3 has light mileage, but the ascent to Numa Pass is long and gruelling.

Starting at Floe Lake Trailhead

    • Day 1: Floe Lake Trailhead to Floe Lake (10.5 km)
    • Day 2: Floe Lake to Tumbling Creek (17.1 km) – Hardest Day
    • Day 3: Tumbling Creek to Helmet Falls (12.3 km) 
    • Day 4: Helmet Falls to Paint Pots Trailhead (14.2 km)

Notes: Day 2 will be tough. After making the big descent from Numa Pass to Numa Creek, you’ll make the long and thigh-burning ascent to Tumbling Pass. Day 1 is likely to be the next most challenging as the climb to Floe Lake is significant.

Descending the Floe Lake Trail on the Rockwall

Rockwall Trail in 4 Nights/5 Days

The Rockwall Trail’s incredible scenery is worthwhile sticking around for and with 5 established campsites along the trail, why not make use of them? By going with this itinerary you’ll break all major elevation gains into separate days. This seems to be the most popular way for most backpackers trek the Rockwall. The more relaxed schedule allows you to sleep in a bit and relax at camp after arriving early in the afternoon. If this sounds like the type of adventure you’re looking for, here’s how to make it happen:

Starting at Paint Pots Trailhead:

    • Day 1: Paint Pots Trail Head to Helmet Falls (14.2 km) 
    • Day 2: Helmet Falls to Tumbling Creek (12.3 km)
    • Day 3: Tumbling Creek to Numa Creek (7.9 km)
    • Day 4: Numa Creek to Floe Lake (9.3 km) – Toughest Day
    • Day 5: Floe Lake to Floe Lake Trailhead (10.5 km)  

Notes: This itinerary is the standard Rockwall itinerary that many backpackers choose. The climb to Numa Pass on Day 4 is likely to be the most challenging.

Starting at Floe Lake Trailhead

    • Day 1: Floe Lake Trailhead to Floe Lake (10.5 km) – Toughest Day 
    • Day 2: Floe Lake to Numa Creek (9.3 km)
    • Day 3: Numa Creek to Tumbling Creek (7.9 km)
    • Day 4: Tumbling Creek to Helmet Falls (7.9 km)
    • Day 5: Helmet Falls to Paint Pots Trailhead (14.2 km)
  •  
  • Notes: This itinerary is the standard Rockwall itinerary that many backpackers choose. The climb to Floe Lake (Day 1) is likely to be the most challenging, with the climb from Numa Creek to Tumbling pass (Day 3) a close second. 
Vermillion River Canyon by Floe Lake Trailhead

What to Pack for the Rockwall Trail

Since I backpacked the Rockwall, I’ve changed and continuously improved my gear setup to lighten my pack weight. Backpacking light makes it easier to cover long distances, large amounts of elevation and be a lot more comfortable doing so! 

That said, if you’re new to backpacking, don’t stress out about buying the latest and greatest equipment. Save money and use things you already own  or borrow things from a friend. Later, when you’ve gained more experience, modify your kit and change out gear as you get a better understanding of what creature comforts you can and can’t live without. Even then, it’s a consistently evolving process. 

With this in mind, here’s a list of what to pack and gear suggestions for hiking the Rockwall Trail.

Park Pass and Site Reservations

Don’t forget to buy a park entrance pass or Discovery Annual Pass and leave it on the dash in your car. To avoid the line at the park gates, or if you’re driving past the ticket windows at the National Park gates before opening, buy your park entrance pass and print it in advance.

Additionally, print and bring along the campsite reservation/backcountry reservation confirmations for your trip.

Best Tent for the Rockwall Trail

I upgraded to Mountain Hardwear Strato UL2 last year.  It’s semi-freestanding (needs to be staked), double walled and weighs in at a mere 2.5 lbs. Unlike many 2-person tents, it doesn’t have a tapered floor and can fit 2 extra wide sleeping pads side-by-side with no overlap. A rare feature in this class of tent!  It’s cozy, but workable for two and palatial for one!  I debated between this tent and the MSR Freelite and ultimately chose the MH as it was in-stock. The MH Strato doesn’t seem to be as readily available in Canada, so you may want to go for the MSR Freelite to avoid the risk of paying duty shipping the MH from a retailer in the US.  Ultimately, both are a great lightweight tents with similar features, but feel very fragile given their lightweight components.  If you’re looking for more durability/resilience these aren’t the tents for you. 

If you’re looking for a completely freestanding tent that offers more durability, check out the Big Agnes Copper Spur UL2. It’s unique blend of functionality, livability, weight, and durability earn high praise and Big Agnes’s customer service is outstanding!  

Best Backpack for the Rockwall Trail

If you’re relatively new to backpacking and building out your kit slowly, there is nothing wrong with using a large size travel backpack with a decent suspension system and padded hipbelt or borrowing a pack from a friend. This gives you time to decide what features you need and whether or not backpacking (and the gear) is something you’re going to invest in.  When I first started backpacking, I used my Khmer Explorer Travel Set on the West Coast Trail and Sunshine Coast Trail which worked great despite my poor packing skills (don’t recommend backpacking with 55lbs…)!  

If you’ve begun dialing in your backpacking kit,  check out the Gregory Focal or Women’s specific Facet. At ~2.5lbs these packs provide a great compromise between barebones ultralight packs and the heavier feature laden packs. The Osprey Exos (men’s) & Eja (women’s) backpacks are also great packs comparable in features and weight.  

If you’re ready to go to an extreme level of gram counting and have eliminated all creature comforts check out the Hyperlite 3400 southwest. It’s 100% waterproof and constructed from ultra light dyneema fabric. Being ultralight, you’ll sacrifice features, so if you hate getting a swampy back (that’s me) you may prefer the Osprey or Gregory despite the small weight penalty. Backpacking gear is always a zero sum game! 

Sleeping Mat

I used to have terrible sleeps in the backcountry until I switched to the Therm-a-Rest NeoAir Xlite. It’s incredibly lightweight, comfortable and packs down to the size of a Nalgene bottle. This is probably one of my favorite backpacking items! Try it out. You won’t regret it. Sleep well!

Backpacking Pillow

Yes, you can sleep with a pillow not made of bunched up clothes in the backcountry.  I love the Nemo Fillo Elite, but they’re harder to find in Canada. Fortunately, this one from Sea-to-Summit are a similar concept, weight and size. 

Sleeping Bag

I can’t speak highly enough of Patagonia’s Fitz Roy sleeping bags I invested in one several years ago. It’s unbelievably lightweight and packs down small. I found the 30°F / -1°C to be perfect for most outings. Like all Patagonia products, it’s not cheap, but they stand behind their gear and the quality matches the price point. If you spend a lot of time in colder environments they also make a 20°F / -7°C version.  These bags are a very worthwhile splurge you won’t be disappointed in.

If you’re looking for an even lighter-weight option, consider going for a sleeping bag quilt. Feathered Friends  Flicker UL Quilt Sleeping Bag has won numerous awards and is a stalwart among ultralight backpackers. With a weight starting at  526 g (1 lb 2.5 oz), I can see why!  

Water Purification

I love the Steripen. It’s light, portable and only takes minutes to purify a liter of water in a Nalgene. Press the button, place the pen in your bottle, and stir for a couple minutes. It’s like magic! Make sure to bring a few purification tablets as a backup should you run into any technical problems/dead battery with your Steripen.

Trowel, Toilet Paper & Hand Sanitizer

The Rockwall trail feels like luxury with established outhouses at each campsite, that said you need to bring a trowel for digging a cathole in case nature calls at any other time. Follow minimum impact camping principles and be sure to go at least 200m away from any established trails, campsites, or water (creeks, lakes, rivers etc.). Pack out your TP or hang onto it until you reach the next outhouse.

Don’t forget a  small bottle (1 oz) of hand sanitizer.

Swiss Army Knife

Fixing gear, cutting food, a swiss army knife is your go to everything too for backpacking.

Stove & Fuel Canisters

Lightweight, convenient, and reliable, the MSR pocket rocket has been my go to backpacking stove for years.

Lighter & Matches

A bring a small baby Bic lighter (in a mini-ziplock to keep it dry) & a few matches as a failsafe.

Backcountry Cookset

I love the GSI Halulite Microdualist II, Two-person cookset. It’s lightweight and I can fit my MSR pocket rocket and a fuel canister inside. If you don’t already have a stove, consider the MSR PocketRocket Stove Kit for an all-inclusive solution.

Water Bottle or Reservoir

Nalgenes are always a backcountry favorite. If you’re cutting weight or looking for a way to save a buck, a simple smart water is the go-to for ultralight backpackers. I’ve recently moved to a hydration reservoir as it allows me to stay hydrated continuously without stopping to grab and open a bottle.

Water Container

The Rockwall Trail has a pretty solid supply of accessible water sources, but sometimes it’s nice to have extra water storage capacity for cooking and camp.  The MSR DromLite Bag V2.  are a lightweight option to add this convenience and are essential on trips with less reliable water sources. 

First Aid Kit

From blisters, to scrapes, and cuts. A first aid kit is an essential item to have.  The pre-built kits from Adventure Medical Kits have served me well on many adventurers. At the end of your trip write down any items you used and replace them so they’re ready for your next adventure.

Hiking Poles

For the grueling passes of the Rockwall, poles make a big difference!  I resisted getting them for years, but take it from a former skeptic, poles are incredible at reducing the strain of long, gruelling descents and providing extra stability on exposed sections. Do yourself a favor and get a pair of poles. I‘ve had great luck with these Leki’s, but for a reliable entry-level option try these Black Diamond Poles. Black Diamond also makes a carbon fiber version if you’re looking to save extra weight.

Bear Spray

The Rockwall trail passes through prime Grizzly Bear country making Bear Spray  an absolute must! Make sure to remove the packaging, check the expiration date before heading out, and know how to use it.

Dry Bag

The Rockwall offers bear storage boxes at every campsite so you can leave your buiky bear can at home! For trips like this, I use a dry bag to store my food, camp cook wear, and toiletries/scented items in, making transportation easy to the bear box and keeping everything nicely organized inside my pack.

Headlamp

The Spot 500-R is the way to go with 9 modes including the night vision saving red light!  Red light mode takes a minute to get used to, but once you do it’s a total game changer trust me! The stars never looked so good!  The Spot 500-R is rechargable, but with a batter life of over 19 hrs on medium and 7hrs on high it should get you through the trip!

GPS, Compass & Map

The Rockwall Trail is extremely well marked, but download the GAIA app for maps and gps. Additionally, I always bring a traditional compass and map in the case of technical problems or dead batteries.

Power Bank & Charging Cable

Don’t forget a power bank to keep your phone charged for photos and gps. Plus a backup for charging your headlamp if it needs a recharge. 

Clothing & Accessories to Pack for the Rockwall

Shell Jacket

A shell jacket is one of the most important items in your backpacking kit and it’s vital to have a great shell for the rapidly changing mountain environment you’ll experience backpacking the Rockwall. The Arc’teryx Beta shell is the best all around shell jacket. This shell performs in all adverse conditions and is the perfect outer layer for rainy days, or cool nights. Arc’teryx gear is expensive, but impeccably designed. I was skeptical for years, until I purchased a few pieces of their trail running gear and got hooked. If you’re looking for the best reviewed hiking shell out there, this is the one. 

For another excellent option that is more economical,  check out the Patagonia Torrentshell 3L

Puff Jacket

I’ve had the Patagonia Nano Puff Hoody for years and it works great on it’s own or layered underneath your shell for extra warmth. It’s a perfect multi-functional item for everyday, backpacking, and pretty much anything where you might need a bit of warmth. I’m still looking for an activity it doesn’t work for. 

Rainpants

You leave camp on sunny beautiful day breaking sweat over a pass, only to have storm clouds roll in an hour later and dump sleet on you. Rainpants are lifesaver for rapidly changing mountain weather.  Many have the functionality for quickly taking them on and off without removing your shoes/boots allowing you to stay comfortable even if you get caught in a sudden downpour.  I’ve been happy with the Black Diamond StormLine Rain PantsThe Patagonia Torrentshell pants are also a great option. 

Sun Hoodie

When I went backpacking in the Grand Canyon a few years back, I was shocked to see throngs of Arizona Trail thru-hikers wearing hoodies in the  40 C heat. Turns out they weren’t just lost tech bros in the Grand Canyon, they were really onto something! A sun hoodie has been one of the best items I’ve added to my backpacking kit. They keep you burn free, are surprisingly cool, and let you get away with leaving the bottle of sunscreen at home (or bringing way less). The Sahara Sun Hoodie from REI is one of the best items I’ve added to my backpacking wardrobe and you can’t beat the price. 

Zip Off / Convertible Hiking Pants

I never thought I’d see the day I embraced the zip-off pant. But hey, they’re the best of both worlds. Check out the Quandary Pant for a great option

A pair of shorts

In addition to hiking pants, it’s nice to have a pair of shorts to change into after a long day on the trail or as a backup option. Trail running shorts are light and comfortable. 

Base layer top

In addition to a sun hoodie, I also bring one base layer top to change into at camp or have as an alternate. The Capilene Cool trail  t-shirts work great for me on long hikes and trail runs, but pretty much any athletic quick-dry top will work fine. 

Base Layer Bottom

A merino wool or synthetic bottom baselayer is perfect for warming up at night or during chilly mornings.

Underwear

I’ve had the best luck with Patagonia underwear for hiking, trail running, mountain biking and skiing and found them to be more durable than the more expensive ones from lululemon. I usually bring a 2-3 pair depending on trip length. 

3 Pairs of Hiking Socks

Darn Tough Vermont makes the best hiking socks hands down. They’re guaranteed for life/replaced free of charge and they don’t stink. Really! I typically bring 3 pair. 1 pair for hiking, 1 pair to change into at camp, and a reserve to throw into the rotation as needed. 

Gloves

I typically bring a thin weatherproof pair of trail running gloves, like these

Sun Hat & Winter Hat/Toque

A cap or Tilley hat keeps your face protected from the intense mountain sun. A toque is great for warming up during chilly mornings, evenings or when the weather takes a turn. 

Sunglasses

Protect your eyes, don’t forget to bring your Sunglasses!

Trail Runners or Boots - Are Trail Runners or Hiking Boots Better for the Rockwall?

The answer here is it depends! If you have your backpack weight down to less than 20-25lbs and have a decent amount of backpacking experience, trail runners are the way to go during the summer months. If you’re going at a time when snowfall and colder weather are a possibility go with boots. Boots are also a better choice if you have a heavier pack and are newer to backpacking as they provide more stability and sturdiness. You also feel rough sections of the trail alot less on the base of your feet!  

In October with the cold weather and snow a real possibility I hiked the Rockwall in my Scarpa Kailash Hiking Boots.  During the summer months and with a light load I’d wear my La Sportiva Bushido II.

Camp Shoes

Crocs are back! Well for backpacking camp shoes they never left… They’re lightweight and ugly as ever. Many backpackers find them to be the perfect camp shoe for resting sore feat after a long day in boots/shoes.

Personally, I still hate them. I have an old pair of Tom’s which I occasionally bring. They are light and less bulky than Crocs. If going with a trail runner, I’ll often ditch the camp shoe altogether and just loosen my laces. Your call!  

Microspikes (Season Dependent)

Kahtoola Microspikes slip effortlessly over your boots and make walking on snow and ice a breeze. These are absolutely essential for early season travel or later in the year when snow/ice are a possibility.

Low Trail Running Gaiters

Low gaiters are perfect for keeping rocks, sand, and snow out of your trail runners/boots and preventing blisters.

Additional Items to Pack

Toothbrush & Toothpaste

I recently started packing these toothpaste tabs in a tiny plastic bag/ziplock to save more space.

Duct Tape (For Repairs and Blisters)

Food

Everyone has different takes and caloric requirements, so I’m not going to tell you exactly what to bring. I generally avoid the just add water meals you find at REI or MEC.  They’re overpriced and often don’t rehydrate as you’d like. Check out these incredible soups and chilis they taste better, are made with better ingredients, and are less expensive. As another option,  I head to the grocery store and search for things like lentil rice, ramen, or plant-based mac & cheese. They’re basically just add/boil quickly meals and taste like real food. Always rebag/repack this type of food as there is no reason to carry unnecessary packaging weight on the trail.

Travelling from outside Canada? DO NOT FORGET THIS

If you’re traveling from outside Canada don’t forget to purchase comprehensive travel insurance that includes emergency evacuation!

Check out World Nomads* for a quote. Hopefully you never need to make a claim, but if you do you’ll be beyond happy you were prepared! I broke my collarbone  traveling a few years ago, which hurt enough! I can’t imagine how much worse it would have felt if I had to pay the $15,000 in medical bills out-of-pocket. 

*We receive a fee when you get a quote from World Nomads using this link. We do not represent World Nomads. This is not a recommendation to buy travel insurance.

Luxury Items You Could Pack

These items are extreme luxuries for a backpacking trip, but may be worth it depending on your weight priorities and the distance you plan to cover. I’d only  consider these items on a low distance or base camp style hike given their added weight and bulk. 

Camp Chair

After a long day on the trail there’s nothing better than finding a nice comfortable spot to rest your weary glutes. Fortunately, the Rockwall Trail offers tables and benches at every eating area. So this item is almost certainly a leave behind on this trip unless you’re looking for a comfortable spot to sit near your tent. Check out the Big Agnes Mica Basin Camp Chair or the Helinox Chair One.  Both weigh around 1kg, and are light enough to justify bringing on slower/easier backpacking trips where weight isn’t as big of consideration or for trips where you’re taking day trips from an established base camp.

Hammock

If you’ve never strung up a hammock between two trees deep in the backcountry you’re missing out! Nothing beats getting horizontal with some great reading material in the pre-dinner hours or taking in an amazing sunset from your own outdoor couch.  The ENO Double Nest has room for two and at ½ kg  it’s hardly even a splurge to pack.  P.S don’t forget the straps to hang it.

Final Thoughts on the Rockwall Trail

    •  The Rockwall Trail is unquestionably one the best hikes for scenery that I’ve experienced in the Canadian Rockies. 
    • Go late season to avoid the crowds. 
    • 2.5 days felt like the perfect length. It was 2 full days with early morning starts and late afternoon finishes, but plenty of time for lunch, scenery observation, and snacks. The last day from Floe Lake to Floe Lake Trailhead was an easy half day. 
    • The section from Tumbling Pass to Numa Creek felt like it would be quite hot in peak summer months. 
    • What I’d change hiking it again: Nothing! I was happy with the duration and campsites.   
    • Hike it North to South. Floe Lake is a great place to finish. Sunrise there is spectacular. The final day out is short, yet scenic, and makes for an easy conclusion. 

Your Thoughts on the Rockwall Trail?

Have you hiked the Rockwall Trail? I’d love to hear from you.

Questions about the Rockwall? Drop me a line in the comments below and I’ll do my best to help! 

Don't miss these adventures

Plan Your First Backpacking Trip | How to Overnight Hike

Morning views from campsite after backpacking

Planning your first backpacking trip can feel intimidating. What do you pack? What if you forget something? How do you store your food? How do you take a #2?

Maybe you’ve been drawn in by the idea of hiking past isolated mountain vistas, the thought of having your morning coffee by a glacier fed lake, or simply inspired by the desire to feel the sense of adventure and connection with nature that comes with a backpacking. Whatever your reason, a good backpacking trip can easily become the highlight of your summer, or year, assuming it’s planned correctly. 

Unfortunately, it’s the latter that can serve as a major obstacle for getting into backpacking hiking and overnight camping. I’ll be the first to admit that prior to taking my first backpacking trip I was gripped with anxiety. Did I forget something essential? Would our gear work as planned? Fortunately, everything went off without a hitch and I’m certain it will for you too if you follow the simple steps I’ve put forward in this guide to taking your first overnight hike.

Research, plan your route, and pick an easy hike!

Planning an overnight hike thoroughly before embarking is a critical step. The last thing you want is to set off down the trail and realize that the hike is more than you bargained for and that your packing/gear setup was completely wrong. Take some time to do your research, air on the easy side of the difficulty spectrum and familiarize yourself as much as possible with the route in advance.

Person looks at map for planning backpacking trip

Research your first backpacking trip and plan your route

Maybe you heard about a hike or an area via Instagram, driving through a national park, or simply by old fashioned word of mouth. However your curiosity was piqued, take a look for blog posts or pick up a guide book written exclusively for the area you’re interested in from MEC or REI. National/state/provincial park websites are also great resources for learning more about a hike and frequently include pertinent information about closures, dangers, and trail conditions. By taking the time to do a bit of research you’ll be able to answer important questions before setting out like: Is the trail well marked? How difficult is it? Are there any nuances I need to be aware of? How long can I expect it to take? What are the unique transportation considerations (is it a loop hike or a through hike)? What are the water sources like?

Lean towards the easy side of the difficulty spectrum for your first overnight backpacking trip

The Howe Sound Crest Trail, West Coast Trail, Rockwall Trail, and John Muir Trail are all fantastic, but not for your first backcountry adventure. When choosing a trail, pick one you think will be easy and save longer or more challenging hikes for future adventures. Even if you’re accustomed to crushing epic day hikes , your first backpacking trip isn’t about pushing the envelope. 

Instead, your first trip is all about getting comfortable with the preparation and execution components, the addition of a 35lb backpack and making sure everything works the way you want it to. Start small and if possible, select a hike that offers designated backcountry camping areas with a few basics like tent pads, outhouses, or bear boxes. These small “amenities” can really help make things easier on your first adventure, saving you the trouble of campsite selection, cat-hole digging (more on this later), and hanging/storing your food. Furthermore, it’s important to select a hike that follows a well-marked trail unless you have some experience wielding a compass alongside a topographic map.

Sunset hiking

How many nights for your first overnight hike?

For your first hike into the backcountry, make it short and sweet and go for 1 night. A short trip means far fewer meals to worry about, less planning, and a lighter pack. Plus, in the worst case scenario that the weather turns foul or something goes drastically wrong, you’re that much closer to your starting point. If you’re planning a more ambitious trip in the near future, use your first one-nighter as a test run and a great opportunity to try out your gear.

What gear should you pack for a backpacking trip?

Ok, so you’ve picked a fantastic trail for your first overnight backcountry camping trip, you’ve done your research, and you’re comfortable with the logistics. Now it’s time to pack!  What do you already have? What do you need to bring? Before you drop thousands of dollars on new equipment, let’s dive into the gear list.

Backpacking and overnight hiking packing list

Backpack

For your first overnight hike, you’re going to want a backpack in the range of 50L to 65L with a sturdy adjustable harness and hipbelt. Maybe you have a great pack with similar specs that you’ve used for travelling (we’ve seen many people repurpose our Khmer Explorer Travel Set for overnight hikes with great success) or perhaps you have a friend who can loan you their pack. If you’re out of luck on both fronts, check out rental options. Typically, MEC & REI offer rental packs at affordable rates which are a great option for your first trip, especially if you’re not ready to fully commit to backpacking as a full-time hobby! Whatever route you choose, make sure to try the pack out before setting out to ensure it’s properly adjusted with the hip belt doing the majority of the work!

If you’re ready to invest in backpacking gear checkout the Gregory Focal or Women’s specific Facet which at ~2.5lbs provide a great compromise between barebones ultralight packs and the heavier feature-laden packs. 

If you’re going to immediately strive for an ultralight set up, check out the Hyperlite 3400 southwest. It’s 100% waterproof and constructed from ultralight dyneema fabric.

Morning views from campsite after backpacking

Tent

A great tent is an investment that can last you for years. That said, it is definitely an investment in the sense that it can easily run in excess of $400. If you own a tent already and it’s reasonably compact/lightweight, it should serve you fine for your first backcountry camping adventure. Don’t own a tent? Once again, try to borrow one from a friend or look to rent one from your local outdoor gear shop and add in this vital piece of equipment once you get a better feel for how you like to backpack (ultralight, comfort, etc.).

For many new backpackers tents like the  Big Agnes Copper Spur UL2 or the  Nemo Dagger OMSO offer the perfect blend of functionality, livability, weight, and durability. 

Sleeping pad

From foam mats to full inflatables there’s lots of variety on this front too (including price variety). For your first time out, opt for value (i.e. rent or borrow) once again and upgrade later. I used a basic foam mat for years, which I had terrible sleeps on. 

A few years ago l I switched to a Therm-a-Rest. It’s incredibly lightweight, comfortable, and packs down to the size of a Nalgene bottle. This is probably one of my favorite backpacking items! Try it out. You won’t regret it. Sleep well!

Sleeping bag

Depending on where you’re hiking this can be something to give a bit more consideration to. If you’re heading into the mountains, weather can be inclement so you’ll want to ensure you have a bag with a decent temperature rating (or plenty of layers to compensate for a chilly night). Sleeping bags generally offer a choice between down and synthetic. Down tends to be more expensive, but more durable, lighter, and compressible with the only downfall (aside from the ethics question) being its extremely poor performance when wet. Synthetic performs better when wet and tends to be more affordable.

I’m in love with my Patagonia sleeping bag!!  It’s unbelievably lightweight and packs down small. I found the 30°F / -1°C to be perfect for most outings – if it gets colder you can always layer up! Like all Patagonia products, it’s not cheap, but they stand behind their gear and the quality matches the price point. If you spend a lot of time in colder environments they also make a 20°F / -7°C version.  These bags are a worthwhile splurge!

Sunset on Vancouver Island's West Coast Trail

Backpacking pillow

For many hardcore backpackers a pillow consists of a dry bag stuffed with unworn clothing.  Personally, I won’t leave home without a backpacking pillow no matter how light I’m travelling.  Check out the Big Agnes Q-Core Deluxe Pillow It packs down ultra small and provides a new level of comfort after long days on the trail.

First aid kit

An essential item for treating everything from bug bites to blisters. The pre-built kits from Adventure Medical Kits have served me well on many adventurers. At the end of your trip write down any items you used and replace them so they’re ready for your next adventure. You can also build your own.

Swiss army knife

From cutting bandages to serving as the star of your backcountry kitchen, a swiss army knife  is a must-have item for any trip into the backcountry.   

A good camp stove. Always a key item in any backpacking packing list

Stove and canister

A single burner canister stove like  MSR pocket rocket is perfectly suited for all your cooking needs. Don’t forget to buy a canister too! 

Cookware and utensils

A pot (which also doubles as a bowl), a cup for coffee/tea and a spork are all you need. If you’re looking for a value option, remove the handle from an old kitchen pot and bring along a pair of pliers.

I love the GSI Halulite Microdualist II, two-person cookset. It’s lightweight and I can fit my MSR pocket rocket and a fuel canister inside. Check out the MSR PocketRocket Stove Kit for an all-inclusive solution.

Water filtration system

For purifying water, I’m a huge fan of the Steripen. It’s a small, lightweight and efficient way to ensure water is safe for consumption using UV light to purify a litre in about a minute. It’s also a fantastic item to bring along travelling, so even if you decide backpacking isn’t for you, you’ll still be over the moon about your SteriPen. Other options include gravity filters and purification tablets. For the first time out, purification tablets are the least expensive option, assuming you can get past the somewhat chemical taste of your water. 

Make sure to bring tablets as a backup though should you run into any technical problems/dead battery with your Steripen.

A dry bag is an essential item to pack on a backpacking trip

Dry bag

Dry bags like our No Sugar | Dry Bag Kit are great for stuffing and compressing clothes or your sleeping bag to ensure they don’t get wet even if you get stuck in torrential rain.

For a budget and ultralight option, line your pack with a contractors size garbage bag.

Bear canister & bear spray (Region Dependent)

If you’re hiking in grizzly bear country, you’ll want to add bear spray to your packing list and make sure that you know how to use it. Additionally, certain national parks like Yoesmite and Grand Teton may require that you’re equipped with an approved bear canister as well.

Additional items to pack for backpacking:

    • Waterproof Matches
    • Firestarters – For emergency situations
    • Whistle (blast 3 times for emergencies)
    • CampSuds / Biodegradable Soap – For dishes etc.  or just use some water and a rock to clean. 
    • Water Bottle – Nalgene 1L
    • Additional Water Bottle or Water Storage (depending on what your research has told you about water availability)
    • Headlamp – The Spot 350 is the way to go with 6 modes including the night vision saving red light! Red light mode takes a minute to get used to, but once you do it’s a total game changer trust me! The stars never looked so good! 
    • Small USB Phone Charger (and cable)
    • Bug Spray
    • Sunscreen
    • Sunglasses
    • Toothpaste
    • Toothbrush
    • Toiletries / Hand Sanitizer
    • Lip Balm 
    • Trowel
    • Toilet Paper
    • Compass
    • Topographic Map
    • GPS App  ( I like GAIA app)
    • Deck of cards

What clothes should you pack for a backpacking trip?

Here is a standard list of items for your overnight hike. Adapt, add, or remove accordingly depending on the weather/climate of your destination and the number of days you plan to go for. 

Hiking boots/hiking shoes/trail runners

Whether you choose to hike with a boot, hiking shoe or lighter trail runner is largely personal preference. Trail runners provide the agility and weight advantage, but boots often get the edge for support/sturdiness, especially if your pack is on the heavy side.

 I’ve had great luck with the La Sportiva Bushido II. When I’m carrying more gear/weight or if there’s a chance of snow, I’ll wear a larger more traditional hiking boot, like the Scarpa Kailash.

Camp shoes/sandals

Crocs are back! Well for backpacking camp shoes they never left… They’re lightweight and ugly as ever. Many backpackers find them to be the perfect camp shoe for resting sore feat after a long day in boots/shoes.

Personally, I still hate them. I have an old pair of Tom’s which I occasionally bring. They are light and less bulky than Crocs. If going with a trail runner, I’ll often ditch the camp shoe altogether and just loosen my laces. Your call!  

Puff jacket

I’ve had the Patagonia Men’s Nano Puff® Hoody for years. It’s perfect multi-functional item for everyday, backpacking, and pretty much anything where you might need a bit of warmth. I’m still looking for an activity it doesn’t work for. They also make the Nano Puff in a women’s version.

Rainproof / windproof jacket

An essential piece for wind, rain, snow. I’ve had great luck with an older version of the MEC Flash Cloud. Also check out the Patagonia Torrentshell  (or Womens version).

Rain pants

Mountain weather can change fast and rain pants are an absolute lifesaver to have in your backpacking kit. Many have the ability to quickly take them on and off without removing your shoes/boots allowing you to stay comfortable eveb if you get caught in a sudden downpour. Check out the Torrentshell in mens or womens.  

Hiking pants

I never thought I’d see the day I embraced the zip-off pant. But hey, they’re really the best of both worlds for rapidly changing mountain environments and keeping warm in the evening when the temperature drops. Check out the Quandary Pant for a great option.

Sun hoodie

When I went backpacking in the Grand Canyon a few years back, I was shocked to see throngs of Arizona Trail thru-hikers wearing hoodies in the 40 C (100F) heat. Turns out they were onto something! A sun hoodie has been one of the best items I’ve added to my backpacking kit. They keep you burn free, are surprisingly cool, and let you get away with leaving the bottle of sunscreen at home. The Sahara Sun Hoodie (men’s/women’s) from REI has served me well or check out these ones from Outdoor Research (men’s / women’s).

A couple of base layer shirts

Avoid cotton shirts unless it’s a super leisurely hike. Merino wool is great as it stays warm when wet and won’t stink. Sweat wicking althletic shirts also work great. I have a few pairs of these Capilene Cool shirts that are great! 

Base layer bottom

merino bottom baselayer are perfect for warming up at night or during chilly mornings.

A couple pairs of merino wool socks

Socks are a critical part of your backpacking wardrobe. A great pair of merino wool socks are an essential investment. They stay warm when wet, don’t stink, and will last for years. Darn Tough Vermont makes the best hiking socks hands down. They’re guaranteed for life/replaced free of charge and they don’t stink. Really! I typically bring 3 pair. 1 pair for hiking, 1 pair to change into at camp, and a reserve to throw into the rotation as needed. 

Underwear

Patagonia makes fantastic underwear with quality, durability, and comfort far exceeding lululemon, and saxx (I’ve tried both). You decide how many or how few you bring….   They also make womens’ underwear, but I am unable to advise on fit, form, function or durability on this front… 

Additional essential clothing items

    • 1 pair of shorts/extra change of pants
    • Hat (Toque and sun hat)
    • Gloves

Should you bring hiking poles backpacking?

I once had an ego and thought I didn’t need poles. Then I completed the Howe Sound Crest Trail and my knees screamed at me for the next week. My overweight pack and lack of poles were to blame. Poles are great for reducing the strain of long grueling descents and providing extra stability on exposed sections.  Do yourself a favor and get a pair of poles! For a reliable entry level option try these Black Diamond Poles or consider upgrading to the carbon fiber to save extra weight.

Meal planning for backcountry camping

Meal planning is one of the most critical steps of any backcountry adventure. Do it right and you’ll be eating like a king without the burden of carrying excess weight. Do it poorly, and you’ll either be hungry or severely overbunded by the weight of excess food. This is where the critical step of meal planning comes into play.

Start by counting out the number of meals and snacks you’ll be hiking or in the backcountry for and then allocate food to each. For simplicity, freeze dried meals (just add boiling water) like Backpackers Pantry are always an option, but at $10+ a meal, they’re definitely not for the price conscious. Alternatively, look for “just add water” items at your grocery store like ramen, instant soups, rices, etc. Additionally, numerous incredible recipes can be found for amazing DIY backpacking meals. Check out this list from Fresh Off the Grid for some inspiration! 

No matter what you’re cooking, try to minimize the packaging you bring along. Don’t bring items in cans or glass jars and consolidate larger boxed items into more packable ziplock bags. Small steps like these save large amounts of weight and volume in your pack. It’s never a bad idea to pack more food than you think you need especially on your first couple of trips. I’d happily add an extra pound to my pack for the extra peace of mind to know that should the trip take longer or if I’m hungrier than anticipated, I came prepared. 

To help you get started, here’s a summary of the meal prep I might use for a 3 night backpacking trip. I know, I recommended only heading out for 1 night for your first trip, but I figured I’d show a plan for an extra day to give you a few more menu options! Note this a plant-based meal prep, but much can be played with to accommodate different dietary preferences.

Cooking a great dinner after a long day of backpacking.

2 night backpacking trip meal plan

Backpacking breakfast (day 1)

Take the time to eat at home, on the road, or at the trailhead prior to staring. Make it a big one. It will be your last home cooked meal for a few days!

Backpacking snacks (day 1)

Inevitably, you’ll break up a big day on the trail with a couple short stops to take in your surroundings or an incredible viewpoint. This is also a great opportunity to graze by grabbing for your favourite bar (Cliff, Lara, Kind, etc.), fruit leather, nuts, or trail mix. Typically, I’ll go for 1 bar in the mid morning and 1 bar and an apple in the afternoon to help keep the energy up!  

Backpacking lunch (day 1)

Sandwich or wrap made prior to departure. 

Backpacking dinner (day 1)

Chickpea Plant Based Mac and Cheese.

Up the protein game with chickpea pasta like this mac and cheese from Banza. Use powdered coconut or cashew milk to avoid carrying liquids on the trail. Add plant based bacon bits or real bacon bits depending on your dietary preference. Finish up with your favourite chocolate bar or candy.

Backpacking breakfast (day 2)

Quick Oats with Dried Fruit. 

Stoked Oats are my personal favorite. Don’t forget the coffee! Starbucks Via instant takes up no space and doesn’t taste like instant coffee. For coffee snobs who don’t mind carrying a bit of extra weight, consider purchasing an Aeropress for gourmet coffee in the backcountry.

Backpacking snacks (day 2)

We had a good thing going on Day 1. So, let’s stick with it! Pack a couple servings of bars, nuts, trail mix or fruit leather.

Backpacking lunch (day 2)

Tortillas with Refried Beans. 

Backpacking dinner (day 2)

Lentil Rice & “Tuna”

I‘m a huge fan of finding things in the grocery store isle that are packed with protein, but basically just add water.. The right rice “Tuna” is the way to go. It combines lentil “rice” with a plant based tuna for monster satisfaction. 

    • Boil water
    • Add Right Rice and stir. Wait a few minutes.
    • Add plant based Tuna or regular fish in a package (no cans!). Stir to combine.

Eat and enjoy! 

Finish off your feast with your favourite chocolate bar or candy. 

Backpacking breakfast (day 3)

Repeat breakfast with Day 2’s breakfast! Embrace the oats! 

Backpacking snacks (day 3)

Final set of snacks from Day 1. For a third time a couple servings of bars, nuts, trail mix, or fruit leather.

Backpacking lunch (day 3)

We’re keeping it simple once again. Either do tortillas again with refried beans, or a bagel with some form of nut butter. 

Backpacking dinner (day 3)

Hopefully you’re off the trail by this point. Treat yourself to a hard earned beer and dinner out! 

How much should your backpack weigh for a backpacking trip?

As a baseline, your pack should not exceed 20% of your body weight. Following this rule will ensure you remain nimble enough on the trail and avoid overburdening yourself. Unfortunately, for any petite readers, this rule becomes much more challenging, requiring you to choose between going ultra lightweight or breaking this rule. 

Leave on footprints

How do you take a poo while hiking 💩?

Human waste is a major source of pathogens (disease causing agents), so it’s absolutely essential to take the proper steps to maximize decomposition and environmental harm. If you’re new to pooping in the woods, here are the steps to follow: 

    1. Find a spot with dark, rich soil at least 100 meters from any water sources or potential water sources.
    2. Use the trowel (from the packing list) to dig a cathole at least 6 inches deep. If possible, try to unearth the soil like a plug which allows for easy replacement when you’re done.
    3. Do the deed. 
    4. If using toilet paper, you have to bag this out. Do not put it in the cathole as it takes substantially longer to decompose and break down. If you’ve ever wandered across some used TP on the trail you know how disgusting this is. So don’t do it to someone else! Use a plastic bag or ziplock. You can even wrap the outside in duct tape so you don’t have to see it. Alternatively, you can also try natural wipes. Smooth stones, sticks, snow, or moss (where it’s abundant) all work great. Avoid plant leaves (think poison ivy…).   
    5. Once you’ve finished, put in a bit of fresh soil and replace the plug. 
    6. Give your hands a good wash or hand sanitization away from a water source once again. 

Waste and leaving no trace

Leave only footprints, take only memories. We’ve all heard the expression before, but this applies even more intensely to your journey into the delicate backcountry environment. It is absolutely essential to carry everything you brought in out, properly dispose of waste, and follow leave no trace guidelines. 

Everything you pack in must come out with you. That means everything. Be careful when opening bars/packaging that you do not leave wrappers or small pieces behind. If you see other people’s garbage on the trail, be a hero, and throw it in your garbage bag.  

From day hikes to backpacking trips everytime you set out, ensure you’re following and familiar with the Leave No Trace 7 Principles:

    1. Plan Ahead and Prepare
    2. Travel and Camp on Durable Surfaces
    3. Dispose of Waste Properly
    4. Leave What You Find
    5. Minimize Campfire Impacts
    6. Respect Wildlife
    7. Be Considerate of Other Visitors

Leave No Trace Seven Principles © 1999 by the Leave No Trace Center for Outdoor Ethics: www.LNT.org.

Brown Bear walks out of the forest.

How to stay safe backpacking in bear country

Bear attacks are extremely rare and the vast majority of aggressive bear action is driven by protection of food, space or territory. For your own safety and the safety of the bears it is important to take precautions when hiking in bear country. Here’s a few steps to take to ensure your safety:

Travel in a group

By travelling in a group you’ll make more noise and emit more human smells. Bears, which are generally human averse, are thus more likely to remove themselves from your presence long before you have any idea they were there.

Make noise

Clapping, loud talking, your worst singing, and shouting will encourage a bear to vacate the area before you and your group arrive. Make additional noise when a fellow hiker, ranger, or advisory has made you aware of a bear in the area to ensure you give it ample notice of your presence. 

Store food properly

When it comes to storing your food, you can hang your food, use a designated campsite bear locker (likes the ones on the Rockwall Trail) or use a bear canister/Ursack. Making your own bear hang is quite an art that even many experienced backpackers fail to master. Unless you’re ready and able to commit to mastering it by following this comprehensive bear hanging tutorial, get a bear canister.   For several people go with the BV500 for solo adventures the BV450 works great.  This is unquestionably your best and safest bet when hard infrastructure bear lockers or pulley systems are not available and required in many US National Parks.  To save weight Ursacks are also a great option, but they need to be tied to a tree and don’t prevent your food from being crushed and smashed by a hungry bear.

Mind your surroundings and the time of day

Walking near a river? It may be more challenging for bears to hear you, so make extra noise to alert them of your presence in advance. 

Travelling upwind/against the wind? Bears have a highly acute sense of smell, but against the wind you may reach them before the smell of you does, so be extra loud. It’s also important to make extra noise when travelling through berry patches or undulating terrain where you might sneak up on a bear buffet. Lastly, be extra aware during the early morning and evening as these are times that bears tend to be the most active.  

Look for the signs

Keep your eyes open for tracks and fresh scat (poop). If you notice these signs, make lots of noise. Additionally, if you happen to come across any decomposing carcasses, make lots of noise and vacate the area as bears are often drawn to a free and easy meal. 

Bring bear spray and know how to use it

Bear spray has been proven to be an effective deterrent against aggressive bears so it’s a great item to bring along. Learn how to use it before you head out, pop the safety off and give it a test just make sure to be aware of the wind direction in advance. Remember to keep it handy in a holster (don’t put it inside your pack). Unfortunately, it only works in close contact with bears and not as repellent. So do not go rubbing it on yourself. If you’re flying to your adventure, you’ll have to buy bear spray when you arrive at your destination, as it’s a prohibited item on most airlines (checked luggage and carry-on). Additionally, this tends to be more commonly purchased item for hiking in Grizzly country, in black bear country it isn’t as common. In fact, several US National Parks, like Sequoia, explicitly ban it. So, don’t bring it on the Rae Lakes Loop

Cook away from your camp and properly store your food

As mentioned earlier, bears have an extremely acute sense of smell. For this reason it’s absolutely essential to remove any items that smell from your camp area. Fragrant items like toothpaste, sunscreen, and soap should all be placed in your food storage bag and hung or placed in a bear canister. Set up a triangle. Your campsite/tent should be 100 meters away from the area you cook in and the spot you hang your food should be 100 meters away from the cooking area and the storage area. Preferably both food spots (kitchen & storage) will be upwind from your campsite as well. 

Know what to do if you encounter a bear on the trail

If you see a bear from a distance, respect its space and consider going back the way that you came. If you must get around the bear, take a very wide girth around. If you happen to encounter a bear in close proximity on the trail, remain calm, unholster your bear spray, remove the safety and stick with your group. Back away slowly in the direction that you came and talk calmly to the bear to help it identify you. DO NOT RUN! Running can trigger the bear’s prey instinct. 

In the unlikely event that the bear decides to charg, this is the time to use your bear spray. The vast majority of charges are bluff charges. In the worst case scenario where a bear actually attacks, do the following:

Grizzly Bear – Lay on the ground on your stomach as the bear makes contact (not sooner as this could trigger a mauling), playing dead and covering your neck and head for protection. In most attacks Grizzlies will bite or swipe a couple times before moving on. If the attack persists, fight back. 

Black Bear – Fight back. Attack the muzzle concentrating on the nose and eyes.

Final thoughts

By taking the proper steps to research, plan, and prepare, your first backcountry hiking trip is sure to be one of the best adventures of your year. After cutting your teeth on the experience, I’m sure that you’ll likely find yourself hooked. You’ll become more efficient at planning, you’ll dial into your gear setup, and constantly be on the hunt for your next backpacking adventure. The hardest part is taking the first trip, which hopefully you’re now just a little bit closer to doing! 

Happy adventuring! 

Did I miss any advice that would have been helpful? How did your first backpacking trip turn out? Let me know in the comments below!

View along the Rockwall Trail towards Floe Lake.

Rockwall Trail | The Ultimate Guide to Hiking the Rockwall

The Rockwall Trail is one of the Canadian Rockies’ premier backpacking trips. For 55km you’ll be treated to a seemingly unending supply of sublime Rocky Mountain scenery. Here’s how to make it happen with must-read tips for getting a permit and beating the crowds.